Pilot Boat
PHIL PARKER reviews this updated HFM kit, now marketed by Speedline Models
Enjoy more Model Boats Magazine reading.
Click here to subscribe & save.
There is a vogue at the moment for building old model boat kits and long forgotten wooden products are being hauled from dusty lofts to command high prices on auction websites. There must still be some Aerokits or Lesro products lying undiscovered, but some are now being re-issued. However, this kit is unique as far as I am aware as it's a re-issue, but not of a wooden kit.
HFM produced the original over thirty years ago and many modellers have been looking for unbuilt examples for some time. At the 2011 International Model Boat Show near Warwick, Speedline Models were showing their re-issued version and everyone who saw Adrian Gosling sailing it on the pool, wanted one!
I ordered my kit at the show but thanks to some production difficulties, it wasn't delivered until 2012. The work behind the scenes has been terrific as not only have the original moulds been restored and are being used once again, but so have the machines used to produce the vac-formings. Original sets of instructions have been reproduced to complete the package, although the quality of these isn't great, but some 21st century details and advice are included as well.
The kit
This arrives in an nice sturdy box and consists of styrene (plastic) mouldings augmented by a bag of fittings as in Photo 1. The coupling, propshaft, propeller and rudder are supplied for the drivetrain, but the buyer needs to find a motor and I used a brushed 540 type. Some fittings for the upperworks are also supplied. The builder will have to add r/c, speed control and a steering servo along with any personalised parts, plus glues and paints, but for the price it's a very good deal.
Getting started
This isn't a shake the box kit and everything then falls into place, but it is not too demanding either. The first step, and probably the hardest, involves trimming the cabin mouldings etc., and assembling the deck into the hull. Diagrams in the instructions show the trims to make, although even without these, the mouldings are clearly marked. The plastic is thick, so be careful as repeated cuts and a decent sized knife are essential. However, very cleverly though, the deck is pre-cut to size and just clips inside the hull. Once the glue joint between the two is made with standard plastic cement, the hull was trimmed down to the deck top line, ensuring a flawless and very neat fit. The whole hull and deck is then really quite rigid.
Running gear
Inside the hull, the 540 motor, coupling and propshaft were aligned after the propshaft tube outlet hole was drilled in the hull, as marked. A conventional motor mount made things easier to fit in my humble opinion and by opening out the retaining holes in the face of the mount, this also allowed some adjustment if the initial alignment wasn't perfect. Support was from waste packing leftover from trimming the plastic parts. In the stern, a support is provided for the rudder, Photo 3, and a servo box was assembled from scrap plastic. You get quite a lot of this, so don't throw any away until construction finishes, as it's very handy. The instructions suggest a pair of single stick NiCd's sitting either side of the propshaft. I didn't have any to hand and decided to use a standard 7.2v sub-C battery pack from a Club 500 boat. After all, the motors in each model were 99% the same, so logically this should all work okay. However, this required that the kit battery boxes were hacked-up(!), Photo 4, so the battery pack could be fitted across the hull and early testing showed that it needed to be as far forward as possible to keep the model's nose down at speed.
Superstructure
Moving on to this moulding, work starts by opening-out the windows. There are no markings to follow, but you do need to leave a frame of some sort around their edges. Adjusting a pair of compasses so one leg is longer than the other, Photo 5, allowed a marked line to be created to be later followed carefully with a sharp knife and sandpaper.
At the rear of the cabin, the entire wall has to be removed and moved inboard and Photo 6 shows it glued in place. Some spare plastic behind the joins as reinforcement seemed like a good idea as a perfect fit is difficult to achieve. The precise position of this is determined by placing the cabin moulding over the deck combing until it becomes a snug fit. Within the cabin there is an internal moulding for the wheelhouse – basic but adequate enough.
Quick test
The great joy of a 'plastic' model is that does not need to be painted before a 'wet' test and Photo 7 shows the model being tested. The cabin was just taped in place and with the windows being unglazed, care had to be taken in fast turns to make sure the boat didn't heal over too much and take on water. Anyway, all seemed to okay and the first indications were that the model performed well.
Back to the workshop!
Obviously, sticky tape couldn't be used to hold the finished model together and there was quite a gap between the bottom edge of the superstructure and the deck, Photo 8. Working out a solution to this took me quite a while. Magnets, even rare earth ones, weren't strong enough to keep the two parts together, so in the end some 2mm thick styrene strip was attached to the two sections so that one section clipped over the other as in Photo 9. This actually worked so well the model could be lifted by the cabin perfectly safely.
With all the main construction tasks out of the way, model decoration started with the handrails soldered up from 2mm thick brass rod, Photo 10. A Graupner 1:20 scale deck figure seemed about right, although he will have to duck his head a bit entering the wheelhouse! The rear handrail was made in one section with the middle bit that the man's hand is grasping, being added later. The steps are from scrap styrene.
The handrails around the cabin unit were bent to shape and then soldered to their supports which were already glued in place. This process requires clean metal, a hot soldering iron, plenty of flux and confidence, as you need to do the job very fast to avoid melting the plastic. I got away with it, but than I do a lot of soldering. Metal clips make for good heatsinks, but if you are not confident, then work well away from the model and fit the rail once it has cooled. Alternatively, some cast handrail knobs would make the job easier, that is if you can find some with long stems.
The mast
A key feature, so more soldering to assemble it. No details are supplied for it, so something was bodged-up based on photos of similar craft. The brass tube is a sliding fit in the plastic base so it can be removed while the model is in transit. Photo 12 shows the finished superstructure. Navigation lights, the rear liferaft container, radar dome and searchlight are all supplied with the kit. A scratch built box covers the On/Off switch and added mushroom and cowl vents from Reade Manufacturing plus a Graupner foghorn all make it rather more presentable and these were all 'scrap box' items.
Painting
Aerosols where possible were used and the main cabin colour is Ford Signal Yellow, with the lettering from BECC 20mm high vinyl letters. The hull is satin black with a red oxide bottom.
As mentioned earlier, a basic interior is provided which looks great through the large windows, Photo 13. This just rests on the coaming underneath the main cabin moulding, but hasn't shown any inclination to move when the model is 'at sea'.
A slight snag occurred with my bespoke cabin mounting clips as became clear it was by no means easy to pull the cabin away from the hull once the windows were glazed. Hence, a small bent brass hook is essential to pull the cabin side a little to easily release the whole thing without having to grip the cabin unnecessarily firmly by the human hand, Photo 14!
On the water?
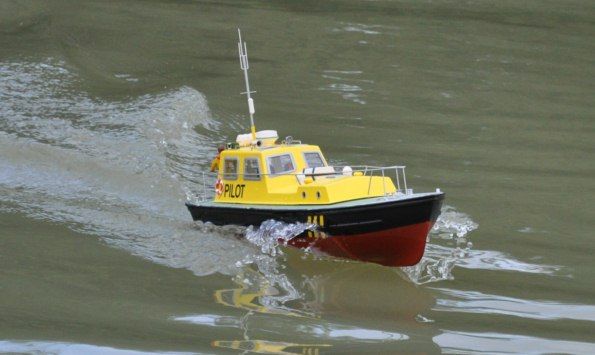
Fantastic! Fast enough to look good and incredibly manoeuverable. It does heel over in tight turns at speed, but so far no water has got inside the hull. If using the suggested battery positions, then I suspect the model would be very safe and stable indeed, but my version is very exciting, Photo 15!
Running time on a 7.2v 3300mAh battery is around fifteen minutes and r/c range using Spectrum 2.4Ghz is perfectly good for our relatively small lake. If it were a problem, the receiver and its short 2.4GHz aerial could be mounted in the forward cabin to get it all well above the waterline.
Three-quarter throttle stick seems about right as any faster and the transom really digs in. A bit of ballast right up in the bow section will stop the boat getting up on the plane quite so quickly and keeping the stern up should give an even higher top speed. However, I like it as it is and model boating is all about creating objects for our own pleasure and not necessarily for the 'scale' pundits.
Conclusion
The only snag encountered during assembly was a simple means of holding the cabin positively in place. Apart from this, the build was pleasant and quick. On the water, the model is eye-catching with plenty of scope for personalisation, for which working lights and deck illumination may be no bad thing. The model fits comfortably in a 27 inch long carrying box and best of all is great fun to sail.
Kit data
HFM Pilot Boat is available only from:
Speedline Models Ltd.
Windsor End Cottage
Windsor Street
Burbage
Leicestershire
LE10 2EE.
Website : www.speedlinemodels.com
Price: £99 + £5 p&p

