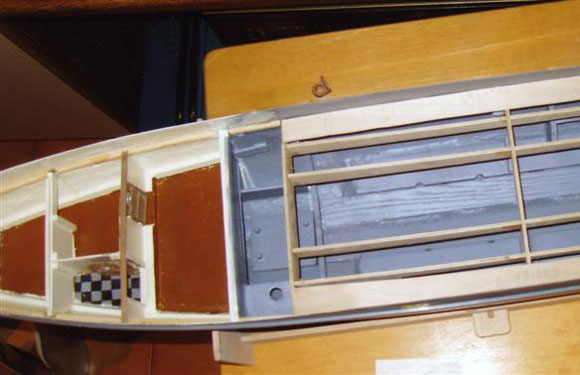
Pic 1: The hull before the deck was installed with the basic cabin layout under the foredeck clearly visible. When completed, all that interior detail can only be seen through the portholes. Pic 2: The foredeck and anchor winch. Pic 3: The charthouse and bridge. Pic 4: The saloon and boat decks. The interior detail of a clock and flag locker in the charthouse can just be seen through the windows. Pic 5: The interior detail of the saloon can just be seen through the windows. In 2004, I thought the time was right to try to build what for me could be the mother of all kits. I have a passion for ships, having worked as a marine engineer and have several models under my belt, so I decided it was now or never. Finally in 2005 the long-awaited kit arrived. Vigilant from Marten, Howes and Baylis, was the most expensive kit available at that time to my knowledge. Partly because of this, I thought it would be quite straightforward (even though they clearly state it is not recommended for beginners) so I sat down to read the instruction booklet. I soon realised that this was not going to be the case and in fact it has been the trickiest and most time-consuming model I have ever built, but also the one that has given me most satisfaction and made me most proud.
Article continues below…
Enjoy more Model Boats Magazine reading in the monthly magazine. Click here to subscribe & save. Looking at the instructions, I could see that some things which were very obvious were explained in some detail, while others that were much more complex were hardly dealt with at all. There were four good plans with plenty of detail for the model and the photographs gave a good overall idea of what it would look like when finished. There was also a list of parts, although it was not clear to which packets they corresponded, making it difficult to know if all the parts were there until the moment I actually needed them. However, whenever any parts were missing, a call to the manufacturer resulted in my receiving them promptly and without charge. Indeed, the rudder which really was not up to the high standard of the rest of the kit, was immediately replaced by them with a top quality cast bronze version, again at no charge. This is not a detailed step by step review of the kit, but is intended to give a flavour of the kit and what you get for your money. To follow some sort of order I’ve decided to comment on aspects of the model in the same order they come in the manual, so we begin with the hull.
|
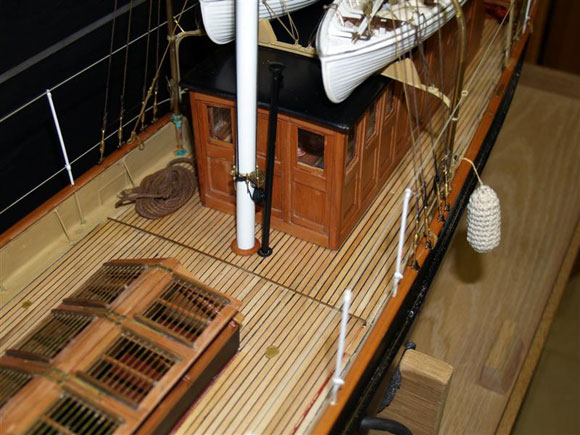
|
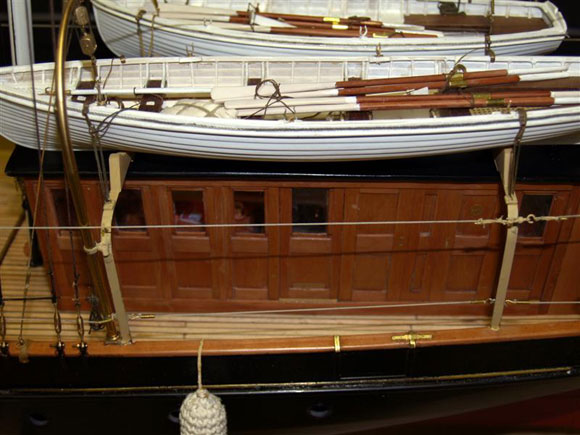
Pic 6: An overhead view of the open engine room skylight, mast and the front of the saloon. The rear edge of the removable section of deck over the steam plant can be seen. Pic 7: The brass steering wheel and glazed binnacle. The polyurethane resin grating is in front of the steering wheel. Pic 8: The Commissioners Bench with the brass castings painted white. The detail inside the boats is clearly visible. Pic 9: The beautiful scrollwork on the stern. The hullThere is little to say here except to remark that it is of high quality, which together with the bronze rudder, makes it very easy to build and in fact more so than other models. However, I would recommend a very thorough sanding of the GRP moulding and in particular the bows to give it the finish it deserves, even though it’s a bit tricky and requires making your own special tool to reach every nook and cranny. I discarded the idea of using adhesive tape (Trimline) for the gold line as suggested in the manual and used brass profiles purchased direct from Aeronaut (ref: 7742/52). Shelves, bookcases and deck beams. Although I followed the instructions supplied, I did make many changes, since in the bows I wanted to include complete cabins, a store room, toilets and so on, just like in the real ship. This was very time consuming, as I made furniture (beds, sets of drawers, bookcases, shelves, heads, doors, washbasins complete with pumps and of course a lighting system) just like you would for a dolls house. This is clearly a very personal decision as it is all covered by the deck and in the finished model is only visible by looking through the hatchway (which I have left open and lit for this purpose) or portholes. Small reward perhaps for so much work, but in a model of this quality I felt it was appropriate. To make the removable central part of the deck, I did it much as the instructions advised, although I strengthened the framework supplied with extra wood, as this was going to be a working model and added a compartment for the switch and batteries for the navigation lights. I also had to adapt the framework to allow for the propulsion system. Barry Shanks (Westbourne Models) sent to me one of the last Gemini steam plants from Cheddar Models. In addition, strengthening the hull helps prevent possible warping from the heat of the steam. I ignored the instructions for securing the removable hatch to the beams, but simply ensured it all fitted very well, as indeed it does, its own weight keeping it in place as in a working model of this sort you need to be able to get easy access to the steam plant. The deckNo sooner had I read the instructions for planking the deck, than I realised it was going to be very tricky, so I tried a number of different ways to do the job. After many aborted efforts, in the end I did it the way described in the booklet, though I did develop a useful technique for finishing the planking. Thin strips of black card to imitate caulking are glued edge down between the planks. In order to be able to handle these and stop them from twisting while you stick them, these strips must be cut wider than necessary and so protrude above the level of planking. The booklet says to trim them off, but to do so with a cutter or scalpel is not easy and results in them being unevenly cut. My technique was to snap the blades of cutters into smaller sections and then glue them face down on to individual small blocks of wood. By placing them flat on the deck and held by the wood they can now be skimmed over the deck, smoothly trimming off any excess card in their path making the use of a scraper afterwards unnecessary. If some areas need a little sanding afterwards to be perfect, it can be done despite the booklet’s warning, as the fine black dust from the card can easily be removed with a clean pencil eraser. Saloon, charthouse and hatchwaysThis was probably the most difficult part of the model and although you have the wood and are given instructions, you are really on your own, since these instructions are extremely vague and really of no use at all. What is more useful here are the plans. In addition, there is little room for trial and error as there is no more wood in the kit than that strictly needed. I should add that the after sales service of Marten, Howes and Baylis was extremely efficient, who supplied me with more wood when I cried help. To be able to cut accurately, I copied and reduced the plans to actual size and cut them out to use as templates. I also abandoned the beading, as the wood is so thin it kept splitting. Instead I used a scalpel for a similar effect. I ignored the half degree sheer of the deck as it seemed to me to be impossible to achieve and is so little as to be completely unnoticeable. On the other hand, to have the saloon and charthouse bare inside and with unglazed windows seems to me to be not only very noticeable, but indeed glaringly so on this scale. Therefore, I fitted out both of these deckhouses. It is true that Perspex attracts dust and so is difficult to keep clean, but there is a perfect alternative by using real glass. That is ok in this scale and it can be easily cut with a Dremel cutting disk. Glass slides used for placing samples under a microscope are just perfect for the job. I decided to furnish the saloon by making a table and adding tiny teacups in 1/24 scale, which I managed to find in a doll’s house suppliers in Bath, England, as well as making upholstered benches, a wall clock, panelling on the walls, a tiled floor, beamed ceiling and even some magazines. To tile the floor I painted one sheet of plywood black and another grey, cut them into small squares and glued them to another piece of plywood so that they were chequered. The best way to make a magazine to scale, is to copy a magazine cover from the internet and reduce it until you get an appropriate size. On the port side there is a w.c. with a window and there I made a toilet, complete with pump, inspired by books (in particular, Nautical Style published by Scriptum Editions, London, was very useful with great photographs) and detail photographs of similar ships from the early twentieth century. The charthouse has also been glazed in the same way as the saloon and has some decoration inside too. For example, you can see the flag locker with pigeon holes for storing the rolled up flags, some books and a wall clock. Of the two hatchways, I built one closed and the larger one near the bows is open, allowing you to see below the deck. Here as I described earlier, I decided to make several cabins and a storeroom, all with electric lights and furnished with beds, chests of drawers, posters and some other details. This is very time consuming and you may well feel is not worth the effort since you can only see all this through the portholes and also when the lights are on, but I know it is there, it is something I enjoyed doing, and the look of surprise on the faces of the public when they discover this is also amusing. Davits and boat railsMany of the parts were really extremely small, so I decided to use soft solder for some sections of the assembly and epoxy glue for others. They were fiddly, but turned out fine in the end.
|
|
Pic 10: Another view of the ships boats and boat deck. Pic 11: The neat, tidy and clean steam plant installation. Pic 12: The clock and other interior detail of the charthouse can be seen in this picture. Pic 13: The superb and totally scratchbuilt grating at the stern. Bridge deckIn general, here I followed the instructions, but again with some amendments. For example, I soldered the winghouses which I positioned directly on the deck level without any gap at all. This was because I made most of the deck removable to allow greater access to the steam plant and everything else below the main deck. I didn’t plank the bow section of this removable deck, but painted it red oxide, the same as below the waterline of the hull. I modified the position of the navigation lights. I didn’t put them resting on the winghouses, but positioned them on the bridge deck. The effect is the same, but you have better access to the working lights, so with the help of tweezers they can be replaced with relative ease when necessary. Another thing I did, was to manage to put real glass in the binnacle and the telegraph, which makes them look 100% better and also helps to keep the printed paper of the compass and telegraph settings, dust free. VentilatorsThese are vac-formed from thick ABS sheets. This is not my favourite material to work with and I would have preferred brass or copper, since you have to use different paints on the ABS. I’m not sure how long they will last, but I suppose this is to keep the kit within budget. Engine room hatch and skylightThis is the best explained part of the instruction manual, the materials are very good and even a drilling jig is supplied. I did nothing different here, simply following the instructions and working with care as always. I did not glaze the skylights to the engine room, so as to permit ventilation. Companionway hatchesI fixed both hatches to the deck and did not place any switches inside as the manual suggested. Instead I left the larger one open so that you can see the stairs that go below deck and the wash basin by the doors of the various cabins that are in there. The hatch which is near to the charthouse is closed. GratingsThe gratings supplied in the kit are polyurethane castings. For the bridge deck I decided to use one of these, as it is relatively small and once suitably painted, it is passable. However, the grating for the aft deck is so much larger that I felt this would be inadequate and would not look authentic enough. So I used it as a template and made my own out of different woods, principally ash. It was fiddly work, but really looks the part and I highly recommend anyone else building the ship to do the same as it makes all the difference to the appearance and is the section of the model that I am most proud of and also that which that provokes most comments. It is completely removable and underneath it I put a piece of plywood painted black to hide the rudder mechanism from view. Commissioner’s benchHere I followed the instructions, except for the fact I painted the brass castings white, rather than trying to make them look like wood and I believe the result is more convincing. It is also removable to allow access to the rudder servo. Flagpole and ship’s wheelI used the flagpole provided, despite the fact it is of polyurethane resin. The flag is excellent although I made it drooping rather than stiff and flat. It has always irked me to see those stiff as a board two dimensional flags on a model that is not moving at all – it looks so unreal. The machined brass of the ship’s wheel is so fantastic it needs no painting and as many ships did have brass wheels, it is appropriate to leave it untouched, even though in reality a brass wheel would have had a thinner rim. I painted the uppermost spoke handle white, as when it is in this position it is this which indicates the ship is going straight ahead and not veering off to port or starboard. Masts and riggingI used the mast provided and assembled it as instructed, although I really am not very happy about the polyurethane castings. I can see that the top of the mast is already a little misaligned, due to this material’s tendency to bend or twist over a period of time. I substituted some of the rigging supplied for a brown cotton thread which I passed through hard wax to lay the fibres. Bows and stern gingerbreadThere was a lot of work to be done here as it was a little rough, in particular the centre piece with the crown inside. As the design was the same as that on the stern flag I copied this and carved one out of wood, mainly using a dental drill with tungsten burrs. The same work could be done with files though it would be more time-consuming. I painted it carefully using the same colours as the flag. I took a long time doing this as it is so prominent that doing it shoddily, or at least with less care, would detract from the model as a whole. For the rest of the gingerbread, I used the plastic castings supplied and filed and sanded them carefully. If you try to gild by directly applying gold paint, the results are not very convincing. First a coat of red/orange should be applied and then the gold paint, once the red/orange has dried. This was a technique used all over Europe for gilding religious imagery and so certainly must have also been used by artists commissioned for ships’ ornamentation.
|
|
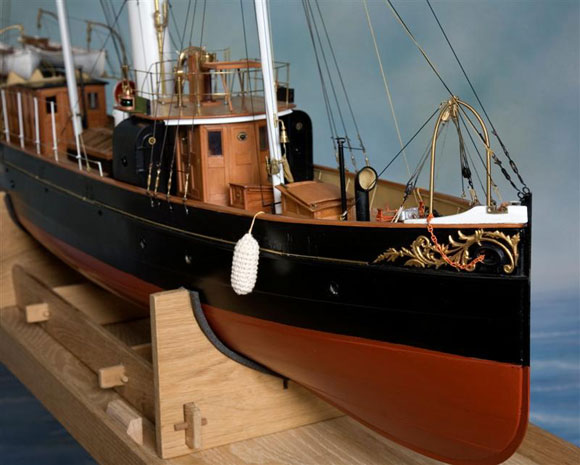
Pic 14: A view along the starboard side of the bows of Vigilant. The 23ft gig and 18ft cutterThe polyurethane castings of the hulls are very fine. However, I did not paint them in the recommended colours, but instead I used white and I believe they look good like this. There are lots of plastic parts included and whenever possible I tried to substitute with wood as painted wood always looks better than painted plastic. So most of my stringers are wood, as are the tops of the gunwales, transoms and of course all the thwarts. Some of these wooden parts are painted and others are vanished, as I felt appropriate. To cut these parts I used two different sized Proxxon saws and in fact I would say they were essential in the building of this model. Using these tools means you can cut any shape you want from any size piece of wood including blocks, including the miniature legs of an old mahogany chair. Making the oars from the pre-cut pear supplied is a time-consuming task and must be done very carefully as they could easily break. I painted the handles white as the instructions said but rather than painting copper coloured binding strips on the blades as they suggest, I cut them from very thin brass sheet and glued them in place. Small parts and standFor the fittings such as the winch assembly and others, I simply followed the instruction manual. A plywood stand is supplied. Although this is not bad, I didn’t feel it was really up to the standard of the model and looked a little flimsy compared to it. So I used the plywood as a template to make a much sturdier stand from solid oak. ConclusionNow that some months have passed since I completed Vigilant, my perspective is clearer as the frustrations and difficulties when building it have faded away. In fact, the more time passes, the more satisfied I feel with it. The kit is expensive and you should expect to spend money on quality tools and saws if you do not have them already, but I really think it is worth it. It is also a model that allows you a fair amount of freedom to wander from the instruction manual and do things your own way. The quality of the kit is unbeatable, at least so far as I am concerned, so the only thing is where do I go from here? Not all the parts I used came with the kit, but some I obtained from other suppliers, especially Aeronaut and the paints were Humbrol (mostly matt, but sometimes mixed with satin) and the hull was sprayed in satin black and red oxide. I would be happy to answer any questions about this or any other aspect of building this model by letter. My address is: Rafael Menendez, Calderón de la Barca 18 2°, Santander 39002, Cantabria, Spain. The kit manufacturer is: Marten, Howes & Baylis, 216 Bredhurst Road, Wigmore, Gillingham, Kent, ME8 0RD. Tel: +44 (0) 1634 233146 or Fax: +44 (0) 1634 264544. Website is www.model-steam-boats.co.uk. Price is around £1650 without steam plant.
|
H.M. Customs Cruiser Vigilant
by
–
Advert
Enjoy more Model Boats Magazine reading every month. Click here to subscribe.
Article Tags:


