Watercat M12 – U619
DAVE ABBOTT reviews the Nautical Marine Models kit
Enjoy more Model Boats Magazine reading.
Click here to subscribe & save.
Following the success of their PT109, Perkasa and Dark Biter kits, Nautical Marine Models have recently released a kit of the Jurmo class landing craft of the Finnish Navy. The manufacturer is Marine Alutech who designate it as the Watercat M12 design. Watercat® is a registered trademark of Marine Alutech Oy, Finland, website: www.marinealutech.com. It has a displacement of 14 tons and a capacity for 20 troops or three tons of cargo.
The Jurmo class landing craft was the result of the modernisation of the Finnish navy in the late 1990's and its main purpose is the landing and transportation of troops in all weather conditions and its minimal draft makes it suitable for amphibious assault. A further 10 vessels have been delivered to the Royal Malaysian Police. A search of the Internet shows the basic design modified and mounting a 120mm mortar as well as those of the Malaysian Police Force, so there is scope for modifying the kit, or painting in a different style if the purchaser so desires. As it so happens, this is how this kit was painted rather than the Finnish Navy colour scheme as depicted in the Nautical Marine Models advertising.
Principal particulars
Builder: Marine Alutech
Displacement: 14 tons
Length: 14.2 metres
Beam: 3.65 metres
Draught: Less than one metre
Maximum speed: 37 knots
Range: 180 nautical miles
Troops: 20
Crew: 2
The kit
The model is kitted to a scale of 1:16 which gives a model hull length of 35 inches and 10 inches beam. The kit includes a GRP hull, CNC printed styrene sheets and laser engraved window frames, windows, two stainless steel propshafts, white metal fittings, brass rudders and a superb 65 page isometric illustrated build manual plus decals, wood strip and more. As usual to complete the model will be needed two motors, couplings, two 35mm propellers, a speed controller and battery(s), plus glues and paints etc.
Getting started
I have to say that this is a well thought out kit and of a high standard. It is always nice when one sees a manufacturer going 'one better' with each new kit being introduced and that is very much the case with Nautical Marine Models (NMM). Starting on the one piece GRP hull, the manual provides the dimensions for the installation of the rudders and the two propshafts and the size of the drills required. It is always a good practice to lightly sand the hull with very fine wet and dry sandpaper and wash thoroughly with warm soapy water to remove any traces of release agent. It is better to do this before adding any wooden parts to the hull as well! Also, a check of the inside of the hull for any glassfibre matting strands sticking out and sanding them away is a good idea as they are a nuisance should one should stick in your finger unintentionally. Basic preparation is no bad thing with any commercial GRP hull. This Watercat hull is top notch quality, something NMM are creating quite a reputation for with their kits.
A stand for the model during construction (and thereafter) is essential and the instructions give the dimensions and recommended construction. I used MDF board for the uprights, but plywood will do equally well. MDF does need to be varnished, since water plus this man-made wood, means it will swell and eventually disintegrate if it is not painted.
Rudders and propshafts
These are easy to install as all the measurements are supplied. There are two propshaft tube supports to be fixed between the tubes and the hull. These ensure they are at the right angle. Photo 1 is of the rudders in place and Photo 2 with the propshaft tubes ready for final gluing in place. Photo 3 shows an inside view and the rudder tube supports. 24 hour epoxy is best for holding everything together permanently, but 'tacking' the propshaft and rudder tubes in place with small blobs of superglue prior to proper gluing can make the task much easier.
Deck
This is one piece unit that is flat and it can't be much simpler than that. The deck supports are balsa stripwood glued to the inside of the hull from bow to stern around the hull's inner top edge with cross beams, and as usual all the precise measurements are supplied in the instructions with 24 hour epoxy once again being the glue of choice. Photo 4 shows the deck supports held in position by a variety of grips, clamps and bulldog clips. Note that supports are flush with the top edge of the hull as the deck fits over the hull and not into it. Photo 5 now shows all the hull and additional deck supports fixed in place ready for the deck to be fitted. This picture also shows the assembled rudder servo mounting and additional deck supports. Plenty of balsawood is supplied, so there should be no shortage if you don't waste the strips unnecessarily. Photo 6 is a close-up of the rudder servo box and you can also just see the internal hull wood propshaft supports.
The next job was to actually install the deck which needs to be cut from printed plastic sheet with the two access openings also cut out, but retained for future use as in Photo 7. Before gluing the deck down onto the hull, its underside should be well roughened with coarse sandpaper and the all the deck supports sanded perfectly flush with the top of the hull. 24 hour epoxy is ideal (once again!) with everything held in place with masking tape. Once the glue has cured, the deck edge can be lightly sanded as need be to match the curve of the top edge of the hull. A narrow strip of wood (supplied) is glued around the hull's top edge to protect the joint, rubbing strakes from styrene are fixed to the hull sides and a dummy bow door added, all as in Photo 8. To be honest, this is all quick and easy model work with waiting for the glue to cure really being the only cause of any delay.
Superstructure
There are two principal parts to this, namely a wheelhouse at the stern and a removable top over the troop/load compartment. These are both assembled from styrene sheet, the adhesive being liquid polystyrene, such as Slater's Mek Pak or Poly Weld. The various individual parts will need to be cut from the printed sheets, but they do all go together very well.
Wheelhouse
Photo 9 shows the start of the construction of the wheelhouse (which has full interior detail) from the printed styrene parts and Photo 10 is of its roof section. Both of these are very straightforward, being just cut, dry-fit together, adjust if need be and then glued. Photo 11 is of the complete basic wheelhouse, but minus its window frames. Now for a few words about these….
Window frames
In this kit, these are included as laser cut examples (and glazing), Photo 12, together with the windscreen wipers. They are all accurately and neatly cut, at the most requiring very minor fettling and of course they can be glued in place with liquid polystyrene adhesive. So, this is one laborious task much simplified. Troop deck cover
This is a bit more complicated, being built over a framework as in Photo 13. You can see that it actually sits over a coaming over the forward hull access hatch and finally ends up like Photos 14 and 15, and please note the very neat small laser cut window frames. The location method is okay, but builders may wish to further include magnets or retaining screws for additional security. The brass handrail material and white metal knobs are included in the kit and require adding after the basic plastic (styrene) work is completed. Note the doors on top of the troop deck cover. The idea is that in action, the cover gives the troops some protection and on beaching, the bow and top doors are respectively lowered and opened to enable rapid disembarkation.
Photo 16 is of the completed basic model and its superstructure units. It really is quite a 'quick-build' model and Photo 17 is a rear view of the stern section of the model. The ladder and handrails are assembled from brass rod supplied using the templates included in the kit.
Power?
The real Jurmo class craft is capable of high speed, so there is no reason why the model should not be likewise, so this was an opportunity to go 'brushless', but what with?
Martin from Westbourne Models obliged with advice, recommending two Tornado Thumper RC Outrunner 3536/06 1520kv V2 MK2 motors as an equivalent (or better) than the 540 to 600 size used in my similar types of previous model, Photo 18.
These motors are rated at 530 watts. They are suitable for 6 to 9 NiMH cells (7.2v to 10.8v) or 2 to 3 LiPo cells (3.7v to 11.1v) and have a 4mm output shaft. Weight for each motors is 95 grams which compares favourably with a normal 550 can type of motor which are around 175 to 200 grams. In other words, more power from less weight!
I was quite taken aback when they arrived and phoned Martin and asked why he had sent me two bottle-top sized motors, but he reassured me that they were more than powerful enough. Photo 19 is of the motors and the rudder servo, showing just how small they really are. They do not need to be watercooled in this installation.
It has to be said that the motors are not inexpensive at £30 each and the matching Hawk BL 60A HV NiMH 6 to 18v, LiPo 2 to 6 cells, (with reverse) electronic speed controllers were £60 each. These esc's each weigh only 29 grams and on the basis that a picture tells a thousand words, Photo 20 is of the complete installation in the model. The battery box is also made from printed styrene sheet provided in the kit and the batteries are wired in parallel rather than in series. No doubt someone might suggest that this is not best electrical practice, but it worked okay for this installation. I usually also include within each model the basic essential tools that might be needed at the pondside and these can be seen towards the bows of the model and there is of course plenty of access via the two deck openings. Ensuring the troop deck cover and wheelhouse don't fall off can be either by magnets, screw fittings, or whatever the model builder prefers.
Painting
As mentioned at the beginning, the basic design is not only used by the Finnish Navy, but also the Malaysian Police, so I decided to go for the latter option. All paints were from the Humbrol range of enamel satin paints and then protected with two coats of satin varnish. This is a relatively simple model to paint, there not being lots of small fittings and just the two main superstructure parts. The broken up overall paint finish just required careful masking. Photo 21 is of the finished wheelhouse and Photo 22 is of the troop deck cover.
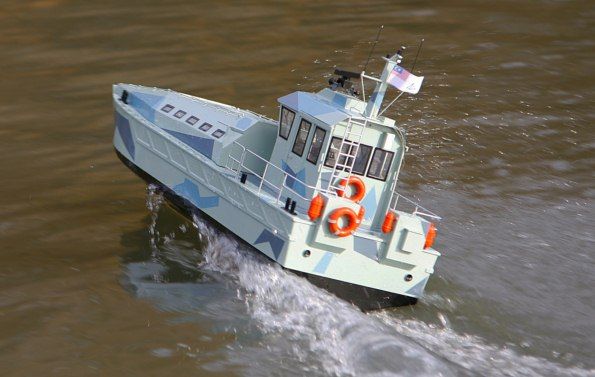
Photos 23 and 24 show the completed model from both bow and stern views, ready for on the water testing.
On the water and conclusion
I was not quite sure what to expect from the brushless motors and was more than surprised by the model's performance. To say it was fast is an understatement, even with the twin 3300mAH 7.2v NiMH packs, Photos 25 and 26. These battery packs gave a reasonable run time when alternating between fast and slow speeds on the water. A later change to 11.1v LiPo batteries gave the model even more speed and a longer run time as the motors were working even more efficiently. So yes, brushless is the way to go if you want speed with lightweight motors, but the downside is the cost. It does have to be said though, that if you use the Internet then equivalent motors and speed controllers may be found, and cheaper, but these motors and esc's as listed have proved just right for this model and as for the kit itself?
Everything fitted, it's a reasonable price at £220, the materials supplied are excellent quality and it is of course an unusual subject. Figures? Yes, to avoid the Marie Celeste look, a coxswain and crew member will improve its operational appearance. 1:16 scale is what military modellers call 120mm, so you may find something there if you search online and Speedline Models have three styles of resin crew figure for their 1:16 scale LCM 3, any of which will not look out of place on this model. No doubt someone will create a means of having an opening bow and deck doors and then a fitted troop compartment interior, so there is plenty of scope for the innovative model builder.
I look forward to the next release from Nautical Marine Models, 17 Liverpool Road North, Burscough, Lancashire, L40 5TN, tel: 01704 894006, website: www.nautical-marine.co.uk
Thanks to Martin at Westbourne Models for his excellent brushless motor advice.

