Voith-Schneider powered harbour tug kit from Graupner
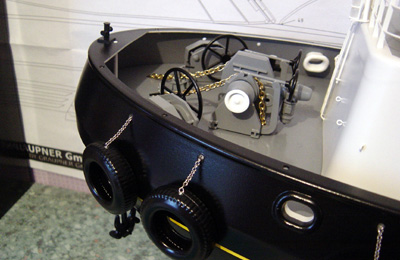
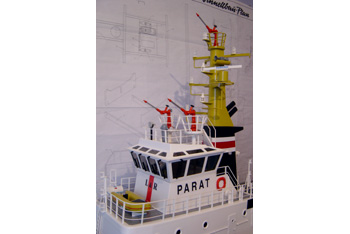
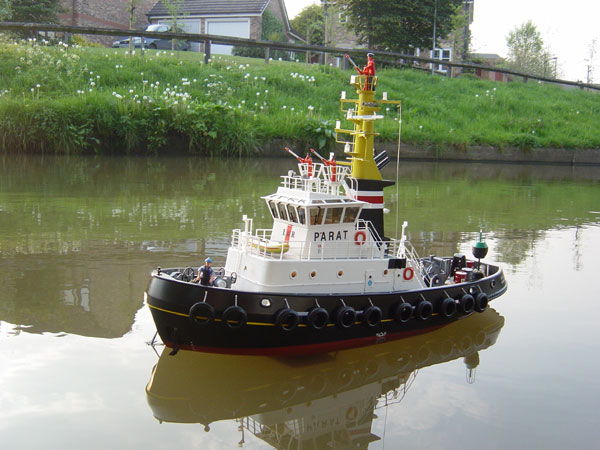
The full-size vessel was built in 1983 by the Detlef Hegemann Roland Dockyard and Parat was delivered to the Hamburg based Lutgens & Reimers shipping company. Pic 1: The mast constructed and primed. Pic 2: Bow detail showing anchor winch. Pic 3: 003 Aft deck detail showing tow winch. Pic 4: Mast and assorted fittings. Pic 5: Underside of superstructure showing the monitor servo. Enjoy more Model Boats Magazine reading. Click here to subscribe & save. She is powered by a unique propulsion system in the form of two Voith-Schneider units, and two by 6-cylinder 4T K.H. Deutz diesel engines, rated at 2,460 BHP each, giving the vessel a tensile power of 32.2 tonnes. She is also equipped with an extensive fire-fighting system for use in the lower Elbe region. Voith-Schneider Propellers (VSP)For those who have not seen this unique form of propulsion the Parat provides a great opportunity to skipper a vessel with a totally different way of creating movement on the water. The way the VSP’s work is quite technical but simply put they take the form of vertical blades projecting from underneath the hull of the vessel attached to a rotating rotor casing. When the angle of the blades is changed this subsequently changes the direction of the vessel. Once mastered the Parat can perform very precise manoeuvres on the water.
|
|
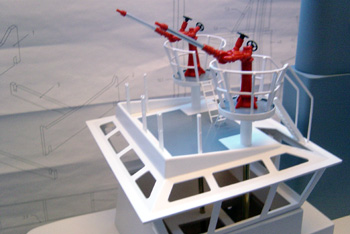
Pic 6: The impressive superstructure and wheelhouse. Pic 7: Servo tray and servos for the VSP drives. Pic 8: VSP Drives complete with motors. Pic 9: 12v water pump for the three monitors. The kitI suppose I am not unlike any other modeller when I obtain a new kit – I just cannot wait to open the box and look at what’s inside. Graupner have not disappointed with the excellent colour photographs on the kit box and on opening one is impressed with the usual very high standard of all the components. Initial impressions seem to point towards quite a quick build with much use made of pre-formed parts. Hull, superstructure, wheelhouse and other various vac-mouldings are pre-crafted to a very high standard. However, the build is directed towards the more experienced modeller which is quite justified with many hours required to produce the finished article. The instructions are very precise and one of the things I really like is the accompanying plans and photograph sheets which give excellent reference points during the build. One of the most important stages of the build comes almost at the start with the cutting of the holes for the VSP drives. The dimensions stated in the instructions must be adhered to for accurate fitting. I used a compass to draw accurate markings on the hull prior to cutting. Small holes are drilled around the entire circumference of the openings to allow easy removal of the scrap ABS. The openings can then be filed back accurately to the marked line. Also the internal wooden hull supports must be fitted to the stated dimensions for the lining up of the drives and servo tray. As recommended, studying the instructions and plans thoroughly prior to commencement of the build will aid and steer the modeller through the various stages of construction.
|
|
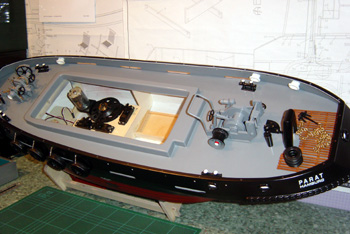
Pic 10: Photo of the finished hull and VSP drives. Pic 11: The VSP apertures marked and drilled ready for removal and accurate filing. Pic 12: Kit box and contents. Pic 13: Tail fin, resined and held in place. Pic 14: Resin applied with a syringe for neatness. Pic 15: Internal timber frame fits snugly into the hull with little trimming. Main buildThe hull / deck / bulwark has pre-cut holes for the hawse ports and scupper openings, and the lower superstructure and wheelhouse are all accurately pre-formed and come together very well to give the model a real ‘tug feel’ very early in the build. The guard for the VSP drives, constructed from ABS, aluminium and brass, is attached to the hull using resin. Stablit Express was used giving a very strong bond but it is down to personal choice which brand to use. The superstructure fits over a generous coaming on the deck with very little ‘fettling’ required to obtain a super fit. The wheelhouse roof and monitor platforms were constructed prior to attaching to the lower wheelhouse which eases the building process. The funnel array which consists of wood, ABS and brass is worthy of mention as a little more patience than usual is needed to put it together in an accurate fashion. Also the monitor platforms need to be constructed with care. There are two on the wheelhouse and one atop the mast which has the added feature of being able to extend – quite neat! This is achieved by the fitting of a sail winch at the base of the funnel inside the superstructure connected to a pulley system within the mast and funnel, giving an impressive elevation.
|
|
Pic 16: Wheelhouse monitors. Pic 17: Internal superstructure frame. Pic 18: Internal timber frame and battery trays. Pic 19: The underside VSP guard assembly. Pic 20: Superstructure internal timber support. Pic 21: Superstructure frame held in place with rubber bands while adhesive dries. Pic 22: Lower wheelhouse being assembled. Pic 23: Wheelhouse and mast monitor parts. Pic 24: Mast and funnel under assembly. I chose to add lighting to the mast which complicated things slightly as there is not a lot of room inside the funnel and mast for the working mechanism which could easily become entangled in any stray wires. I remedied this by sheathing all the wires into one conduit of spiral tubing which tidied things up and stopped any fouling. I know that a number of modellers are choosing led’s (light emitting diodes) to light their models but on this occasion I used commercially available 12 volt bulbs which give a nice bright illumination, even in daylight, and correspond with the recommended power supply. The mini- geared motor for the radar runs off 6 volts so an additional battery is required.
|
|
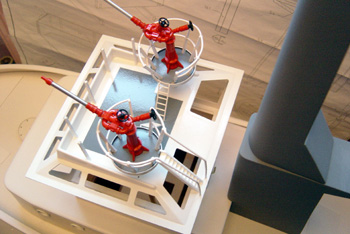
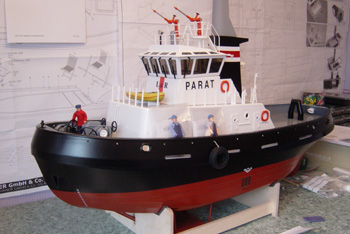
Pic 25: Upper wheelhouse and monitors. Pic 26: Starting to look like a tug. Pic 27: Hull ready for painting. Pic 28: Painting the hull using aerosols. Pic 29: Superstructure and wheelhouse assembly. Pic 30: Anchor winch kit assembled using polystyrene glue. Fittings and paintingThe fittings supplied by Graupner as ever are superb quality, especially the various winch kits which need very little preparation and fit together beautifully. Painting was achieved with commercially available car aerosols which I find give a very good finish, although slightly more expensive than brush-on paint but in my opinion worth the extra. It is down to the individual modeller how he or she finishes their model boat – some prefer a weathered look to the finished vessel, others a more ‘showroom finish’ – all down to the individual in my opinion. Without the adding of further auxiliary functions the Parat is a very detailed model, but I chose to add a working radar which I like on all my models if possible, and some interior detail in the wheelhouse in the form of an instrument panel, lighting and 1:25 scale figures for the ‘skipper’.
|
|
Pic 31: Parat looking good. Pic 32: Parat with scale skipper on deck. Pic 33: Buoy set (not included in the kit) used to ‘populate’ the deck area. Pic 34: Sail winch and servo assembly for extending fire monitor. Pic 35: Extending monitor assembly ready for insertion in the funnel and mast. Pic 36: Wheelhouse console detail (not included in the kit). Pic 37: Wheelhouse console complete (not included in the kit). Pic 38: Companionway being assembled. A really good fit. Pic 39: The fully assembl ed VSP drives complete with motor. Radio FunctionsIt is worth noting that a radio control capacity of at least six functions is required as four are needed just to operate the Voith-Schneider drive system. If the auxiliary functions of working fire monitors, radar, lights, etc., are fitted, a multi-switch decoder may be the answer. As there is not a lot of room inside the hull once the VSP’s, servos and the recommended 12v lead acid batteries (great for ballast too!) are inserted, I chose to operate the individual functions using relay modules which are simple electronic switches and are very compact. However, this raises the cost of the model and I can recommend the guys at www.amodelworld.co.uk for great prices and service.
|
|
ConclusionsGraupner, for me, have produced a brilliant ‘chunky’ tug with a really interesting propulsion system. The setting up of the drives is a trial and error task and it goes without saying that the studying of the accompanying instructions is a pre-requisite. As already stated this kit is not for the beginner, but those with experience of a couple of models under their belts will find Graupner’s Parat a brilliant subject which has genuinely given me many pleasurable modelling hours – ‘Tug-tastic!’ Kit SpecificationsLength: approx. 885 mm.
|
Voith-Schneider powered harbour tug
Enjoy more Model Boats Magazine reading every month. Click here to subscribe.
Article Tags:

