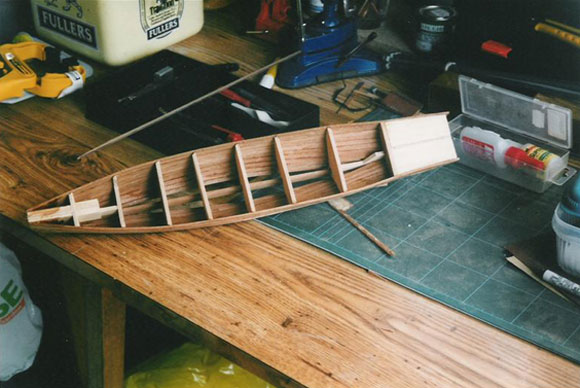
Pic 1: The hull of SAJU VI part planked.
In July of 1998 I reached the important age of 65 and as I could now draw my state pension, I decided to retire and start enjoying the next chapter of my life.
The first thing that I needed to complete on my retirement was the book I had been writing, entitled ‘The Diary of an Ordinary Man’, which was being written for my daughter Caroline, really just setting down on record some of the many stories I had told to her as a young girl.
Enjoy more Model Boats Magazine reading.
Click here to subscribe & save.
However, while sitting in an armchair, my wife Jean had noticed that my right arm had a slight tremor to it which I had attributed merely to being a trapped nerve. However, I was persuaded to go and see my local GP, who duly referred me to a neurologist. Feeling sure that he would merely confirm the diagnosis of a trapped nerve, I kept the appointment and after a number of tests, he diagnosed that I was in the early stages of Parkinson’s Disease.
This came as a bit of a surprise and I asked him about the symptoms and problems I would encounter in the years to come, as he had said it was an incurable condition which would progressively get worse as time went by. He explained the various symptoms and problems/disabilities which could occur, although these were certainly unpredictable since no two patients were the same. It was also impossible to predict at what rate the disease would progress, but I would have possibly some four years before it became any sort of significant problem. Fortunately, this has since proved to be a rather pessimistic assessment.
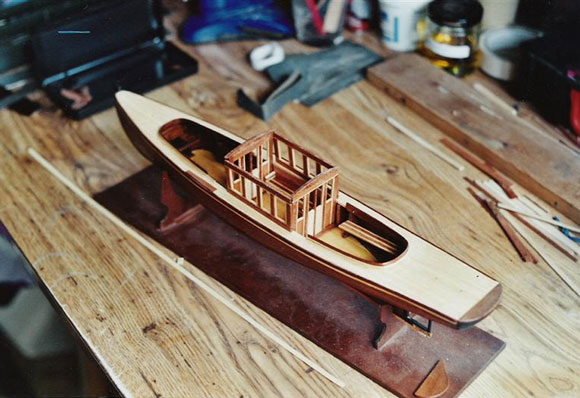
Pic 2: Sub-deck in place and model looking good!
Post diagnosis
I had for many years, been keen on boating and had owned a variety of boats, but due to the anticipated future costs of keeping a fairly large boat, I had scaled down to a smaller Shetland cruiser with an outboard motor in preparation for my retirement. I now decided that the model boat kit given to me by my children some years before needed to be built without delay, before the Parkinson’s tremor made this impossible. That model was the Thames sailing barge, Kathleen. Some years previously I had built a fairly large shed at the top of my garden which I had called ‘The Boat Shed’, in which I kept the paraphernalia of ropes, fenders, outboard motors for my full-size boats With downsizing, a lot of the equipment had been disposed of and I was able to make a very suitable working surface from an old desktop on which to start the project. I laid a cable from the house in order to give me electric light and also capable of running small tools and an electric fan heater, to give me all year round use of my new workshop.
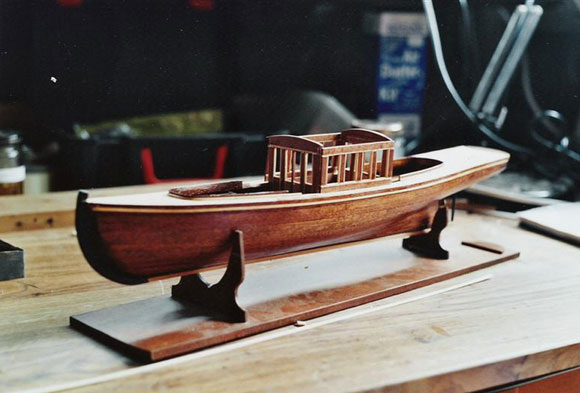
Pic 3: The cabin is nicely finished and the hull planking is neat.
My new hobby
Although I had quite a comprehensive set of tools, they were of course all of a size used for jobs around the house, or certainly full-size works. The tools I needed would have to be a lot smaller and so I acquired these as a start from local model shops and was helped with various christmas or birthday presents, particularly from my wife Jean, who purchased my first battery-powered Dremel drill and sander. Over the years, this collection of tools was to increase with many supplied by traders exhibiting at various exhibitions and shows that I went to in the South of England.
This hobby started to absorb an increasing amount of time and was certainly a very new departure for me, since the last time I had been at all interested, or indeed involved in anything like modelmaking, was probably back in my schooldays when making the odd model aeroplane. Therefore Parkinson’s Disease had prompted me and produced the impetus needed to start my work as ‘The Wobbly Shipbuilder’.
Two years after starting Kathleen, she was completed and although not a complicated kit by any means, I was pleased with the result and at least the birthday present given to me by our children many years before, had duly been completed. Little did any of us think at that time back in 1990, that the present would provide me with a whole new challenge and interest later in life, having contracted Parkinson’s Disease and the associated tremors. My new hobby had certainly turned out to be very much in contrast and completely different from my other interests of classic cars, boats, gardening and rugby etc.
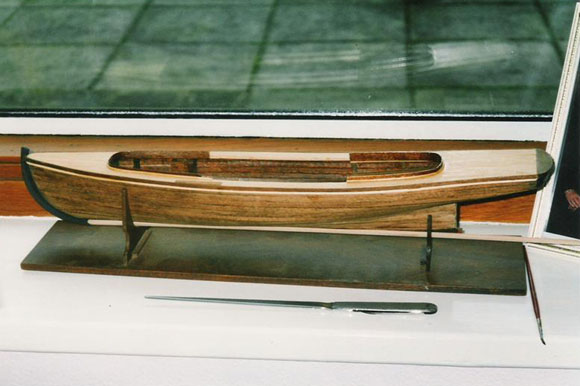
Pic 4: The completed bare hull without the cabin.
The building of SAJU VI
After my success in building the Thames barge, I felt I should like to progress a bit further whilst the Parkinson’s Disease with my wobbly hands etc., enabled me to still do work of this sort which I enjoyed so much.
My next project was to be a Thames steam launch which I would name SAJU VI in memory of my good friend Harry Bengough and his cruiser. Harry had sadly died a year or two before my model was completed. The model is actually from a kit made by a Spanish manufacturer and supplied complete with all the fittings, which needed to be fettled and cleaned up before painting. The whole vessel would be built in the same way as the full-size Thames launches are built. This would mean assembling the ribs on to a keel. The whole of the hull would then be planked, although of course being a model boat, these would be very small, measuring 5mm wide by 2mm thick. These would individually be bent and glued around the ribs to form the shape of the hull.
Little did I realise that this would be a lot more complicated than I originally thought. However, the important thing with any project is to have the best and all the correct tools available. Various visits were then made to different model boatbuilding exhibitions to go around the trade stands and get advice and the additional materials required.
Over forty planks were needed to cover the hull. Additional planks of different materials were required for the windows and the cabin frame and also for the decorative edgings and the benches and seats etc. for the interior of the model.
The decks were also individually planked and this required some twenty planks, measuring 0.6mm thick and 4mm wide. Other materials in this kit included various metal strips for the boilers, wire for the steam inlets and also metal tubes for the stack. There were altogether some one hundred and twenty different parts to make up this static model boat.
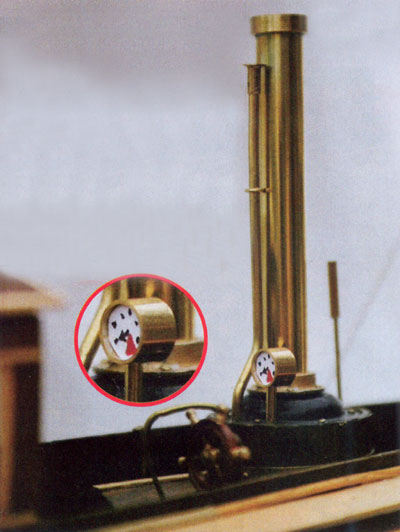
Pic 5: The pressure gauge and funnel.
I was given some valuable advice which was particularly important. This was not to rush detailed model-making, but just to take a little at a time as and when I had a few hours available, or indeed felt so inclined. This proved to be invaluable and fortunately as I had the workshop at the top of my garden with an electric cable to power the small tools, I was able to pick up the hobby as and when I wanted. I was particularly keen not to let the Parkinson’s Disease dictate as and when this would be, as of course most sufferers will know that after taking medication, invariably the symptoms diminish somewhat but unfortunately it also makes you feel a bit sleepy.
Therefore construction was to be whenever I felt so inclined, never mind the time of day or the taking of medication. I did not wish Parkinson’s to rule my life any more than necessary.
The kit
The box of parts purchased was spread out on the table and the first thing was to check that all of the components were included, as per the list and the plans supplied. Next came the exciting start of the whole procedure and the keel was laid with the ribs duly positioned and glued with cyanoacrylic glue (superglue). This comes in different degrees of thickness. It is possible to purchase a thin glue which is very much like water and runs through very small cracks and almost everywhere else, a medium glue which is perhaps the most useful and also a thick version which is more like golden syrup. Adhesion of wooden components using these glues is almost instantaneous and I found that I could hold two pieces together and having watched the clock tick by for some thirty seconds, the glue would have then set and if it was on my fingers they were duly glued to the wood as well! It was therefore important to purchase a bottle of debonder, as it would have been very embarrassing having to walk along with my wobbly hand waving a wooden boat firmly adhered to my fingers, not to mention that it would have made it impossible to drive or even get my keys or change out of my pockets!
Next came the planking and here was a very good example of the subject of patience and taking one’s time. I found that I could actually bond using the superglue and holding the plank more or less in place with my fingers, gluing it to three or four of the frames at a time and then when this had set, I could then move it on and glue it to a further three or four frames until I had completed the whole length of the boat. Although I could grip with my fingers, with my hand wobbling fairly dramatically, it must have seemed odd to see a man sitting in a shed, gripping a boat with the tremor making him gesticulate in different directions. However, persistence succeeded and slowly over the course of time, plank after plank was laid and I was certainly encouraged by seeing the progress achieved.
It is good with any disability to take up some form of challenge, whether it be boatbuilding, knitting, writing, painting or anything else, as the time and effort put in is more than rewarded by the flush and pleasure of success. One of the benefits of building wooden boats is of course that if mistakes are made or parts don’t come out quite as expected, it is very often possible to overcome this with a certain amount of modification or the fitting of additional components.
Eventually, with the hull completed, it was time to start sanding it down and as I had chamfered the edges of the planks, the closeness of fitting would be fairly acceptable. As I sanded it down, I expected to find gaps between planks and was more than delighted to find that this had not occurred and as can be seen from the photographs, it turned out that after sanding, the planks still appeared to be a close fit with each other.
Next came the application of the first coat of semi-gloss varnish. This was slightly thinned down in order to be absorbed by the wood to seal it. Each subsequent coat of varnish, applied after sanding with very fine sandpaper, improved the hull appearance more and more, which certainly from my point of view was most encouraging.
The next major component to be worked on was the decking. The sub-deck was cut out from thin plywood and then planked with the planking strips supplied in the kit. Having cut out the shape from the plywood, I found it easier using long lengths of plank to fit to the ply and then turn the deck over and cut the holes out again from the back, as this achieved the required objective and was much easier than shaping each individual plank and then gluing it to the thin plywood shape. When this was completed, again it was sanded down and had the thin coat of semi-gloss varnish applied.
Now with the deck completed, it was possible to fit the floor to the boat and then the deck itself. Things were now coming together and it was beginning to really look like a Thames steam launch and certainly the patience and time taken was bearing fruit. The only problem with getting good results is of course that it was making me into rather a wobbly perfectionist! By now though, having put up with the Parkinson’s tremor etc. for over three years, it was becoming impossible to remember a time when I did not have this handicap and so the work on the boat, taking the tremor into consideration, was becoming easier to cope with.
I then started fabricating the cabin, which took quite a bit of time with all the rather delicate trimming around the windows and roof etc. This together with the ventilators was planked in the same way as the deck. One problem I found with gluing the Perspex into the window apertures was that if I used the same glue that had been used before for the construction, it had the effect of turning the Perspex into a milky white colour. This was overcome by using a white PVA adhesive which becomes clear when dry. Having fitted the panels together and with the roof glued in place, the whole cabin structure could then be fitted to the hull.
Prior to this, I had made a small table to fit in the cabin and also fitted the seats as it would have been impossible to do this once the cabin was in place.
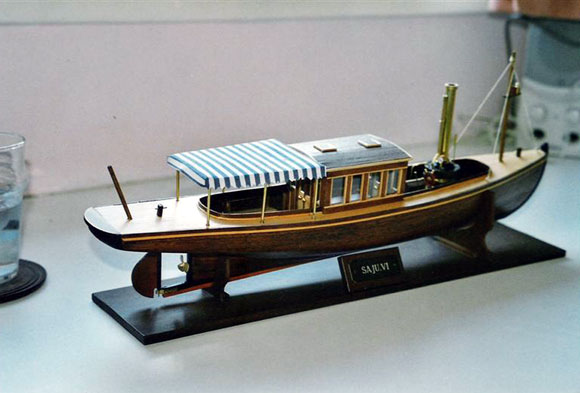
Pic 6: The completed model on display.
During some of the work I had unfortunately marked part of the deck and this problem was overcome by making and fitting some steps.
The work was progressively becoming more and more interesting and the model boiler and firebox were made, together with the brass chimney and pressure gauge etc. The brass chimney was made from the tube supplied with the brass ferrule fitted to the top and the pressure gauge was assembled from the small brass parts supplied.
Now with the launch almost completed, we could step the mast, rig it and finally with a little help from Jean, the frame and sun awning were fitted to the rear of the cabin.
With this project completed over a period of three years, taking just an hour or two at a time, I am already looking forward to the next project, which is to be an old naval cutter, H.M.S. Sherbourne.
(John is to be congratulated for demonstrating that Parkinson’s Disease need not be a bar to making models and indeed continuing with as normal a life as possible – Editor)

