TERRY BURNETT tells us about his model
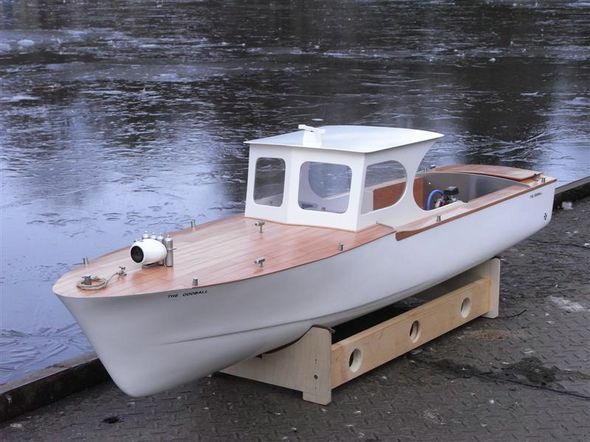
It is a big model. The camera can be seen on the foredeck.
Contemplating my next model, I came up with the following objectives: To scratch build a large scale cabin cruiser of simple unfussy lines and incorporating a well designed 4 stroke engine which although on view would in fact be a dummy engine, the real propulsion being by a hidden electric motor, cooled by water circulated by a pump.
Enjoy more Model Boats Magazine reading.
Click here to subscribe & save.


The hull
My first task was to obtain a suitable GRP hull, 1500mm (1.5m) in length with a beam of around 325mm. I contacted Andy Griggs of Models by Design outlining my requirements. Andy amazingly emailed by return to advise he had just the mould to create such a hull and he kindly sent me several pictures to confirm its size and dimensions. I duly placed an order and received the hull just 10 days later. The hull was huge by comparison with my workshop and thinking that I had overcooked it this time, I approached my wife asking her permission to lay the hull out on her newly fitted kitchen worktop. With permission granted, the worktop suitably protected and after making a suitable stand, the deck line was set up to best advantage using a laser. This line was then marked out all around using a pencil set in a scribing block and then the hull was trimmed to this line.
The keel is lined internally with a length of 30 x 10mm hardwood set in 0.5kg of epoxy resin supporting five glassed in place 5mm ply formers with spruce strip reinforcing. This, plus a sub-deck of 1.5mm ply produced a hull which was very strong and rigid. Accuracy is my watchword and the next step was to fit a ball raced propeller shaft and using a very long pilot drill and an electronic protractor, the propshaft tube pilot hole was drilled at a 12 degree angle and the hole then opened out to its final size. Once the propshaft tube was set and locked at 12 degrees, a former was fitted around the shaft and the trough filled with epoxy resin.
As the motor was to be hidden, the prop. tube extended quite far forward and therefore if vibration was to be kept to a minimum, then correct motor alignment would be critical. An alignment tube was prepared on the lathe and then the motor was rigidly aligned, locked in position and the tube was then replaced with a conventional universal coupling.
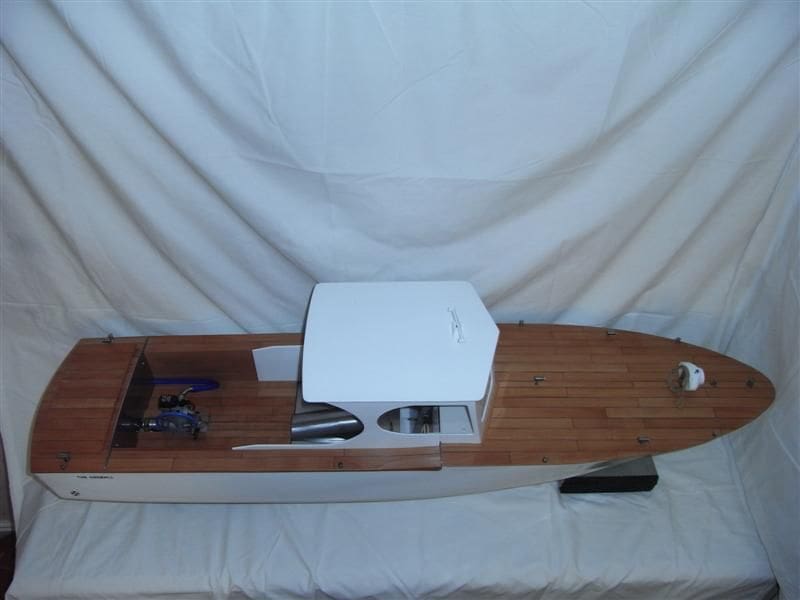
The deck
This was to be planked and these were each cut from sheets of pear. 20mm wide x 1.5mm thick strips were superglued to the sub-deck with black card representing the caulking. After rubbing down and general cleaning up, the planking was sprayed with several coats of good quality polyurethane varnish.
Painting the hull
Spraying the hull was the next task and as my workshop is too small for spraying at this scale I bought a demountable gazebo with walls from Argos to enable me to do the job in the open, but protected from the elements. On a suitable fine weather weekend, the hull was sprayed using Halfords acrylic car spray paints and finished with the correct clear lacquer. (These gazebos are very handy for spraying a model outside in a well ventilated environment, but equally not exposed to wind and dust. For our many thousands of the rest of the world readers, Argos is a high street catalogue shopping chain in the UK Editor)
The cabin
As I had decided on aluminium for the cabin and its visible bulkheads, great care had to be taken not to damage the surface of this material as it is very difficult to reproduce the smooth finish should repairs be necessary. This task, although unusual, was quite straightforward for me and once completed I commenced the final fitting out.
Bits and Pieces
Radar
An electric slow turning version was added to the cabin roof.
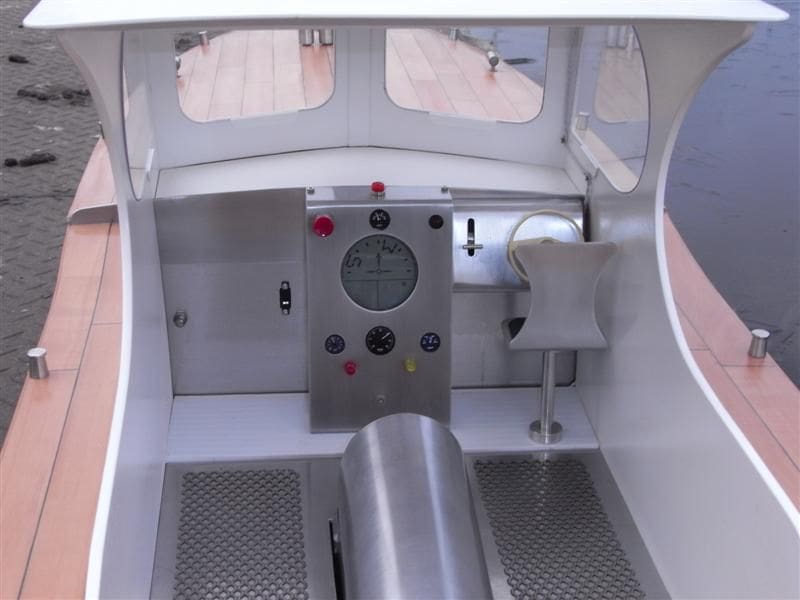
Compass
As the whole design is over the top I also decided to fit an electronic compass into the control panel. Using a Halfords’ car compass as a basis, this was stripped and then built into the internal control panel.
Lights and fittings
These are made from stainless steel with the lights using high intensity LEDs. As can be seen in the picture they are very bright indeed.
Access
The cabin, floors and aluminium bulkheads are easily removed and give complete access to the hull interior.
Camera
This is adapted from a vehicle reversing aid from Maplin Electronics. The camera is a wireless 2.4 GHz unit and can be seen mounted at the bow. I stripped the camera, sprayed the casing in white, but I have yet to disguise the unit as it is rather large. The transmitter from the kit is located under the floor and if you look closely, then adjacent to the rear bulkhead is the transmitter aerial exiting through the decking. The miniature colour receiver from the kit comes complete with a 62mm television screen. The whole assembly is about the size of a cigarette packet, but half as thick and sits comfortably on the top of a transmitter. The picture quality is really quite amazing. You can just see the deck planking at the bottom of the screen which gives orientation and the wide angle lens gives an almost panoramic view, the range of which is beyond that of which you would comfortably sail the boat.
Dummy engine
The OS four stroke engine was fitted with appropriate modifications, toothed pulleys being fitted to the engine crankshaft and to outside tube of the propshaft. Once the drive belt was fitted and the flooring in place, together with a sound unit you really would believe the 4 stroke is indeed the power plant. Blue high temperature silicone tubing represents the exhaust pipe.
Electric motor cooling
I decided to use a separate pump, the discharge being piped through the cooling coil and then into a three branch manifold which discharges through three stainless steel exhausts set in the transom. Regulating valves ensure the exhaust flows are equal and the pump is controlled via a switch on the transmitter. An advantage of this set up is the motor does not even become warm as the cooling is not dependant on a scoop and the water exhausts look quite interesting as they operate even when the boat is at idle.
The propeller
This is a cast high efficiency three bladed 62mm diameter from the Prop Shop
The rudder
This is scratch built and measures approximately 50 x 90mm.
Electrics
Wired throughout with silicone low resistance cable, the model is fitted with two batteries. The main motor battery is a 12v 12ah gel cell, 151 x 99 x 96mm, and it is located towards the bows of the model. An auxiliary battery for the camera, pump, lights, and sound control is a 12v 2ah gel cell, 178 x 34 x 61mm, and this is located behind the transom.
Performance
With the main battery acting as ballast, only a small amount of ballast on the starboard side was needed to offset the weight of the pump on the port side. The model has an impressive turn of speed and I have to throttle back as the wake causes problems to other models due to the wide beam, long length and high displacement of this large craft. Sailing duration on one charge will normally exceed one hour.
I sail at Etherow MBC in Stockport which has a huge mill pond and is ideally suited to a model of this size. However as I have already written, respect must be given to smaller models and although my fellow sailors make no objection, I only sail her at full throttle during quiet times on the water.
Materials
Hull: Models By Design, email: [email protected]
Pear sheet for planking: Dennis Nixon (See advertisements in MB).
Electric motor: Model Motors Direct Buhler ball raced 12v.
Camera: A 2.4GHz vehicle reversing camera kit from Maplin Electronics.
Electronics: Mtroniks Viper 25 amp (See advertisements in MB). Graupner sound controller and motor cooling coil. from Westbourne Models, website: www.westbourne-model.co.uk
Water pump: Ripmax glow fuel pump; regulating valves are aquarium air flow control valves.
Compass and paints: Halfords (a UK chain of car accessory stores)
Batteries etc: Power pack plus high intensity LEDs, silicone wire, gold plated Tamiya style connectors and switches from The Component Shop, website: www.component-shop.co.uk (see adverts in MB).
Propeller: The Prop Shop (see adverts in MB) or website: www.prop-shop.co.uk.

