I yield to no-one in my admiration for those paragons of scratch building who, year after year, walk off with the Gold Medals at the ME and other exhibitions. Such celebrated exponents as Brian King bring to their work an engineering approach which ensures accuracy and imposes an impressive degree of quality control in everything they turn their hand to.
But then Brian is an engineer by training and profession and such an approach comes naturally to him as his recently published articles and excellent book demonstrate.
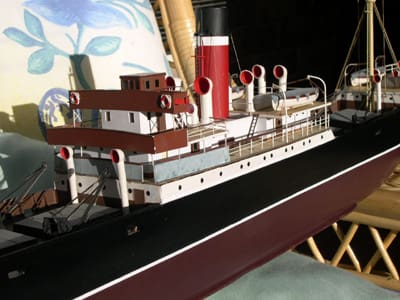
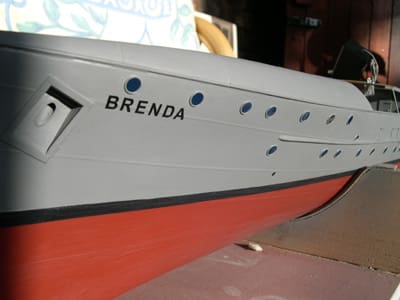
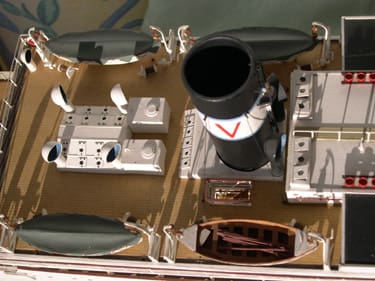
Pic 1 Tramp steamer standoff scale model illustrating stuck on portholes and lining strip boot topping. A superb steering boat. Pic 2 More sophisticated surface mounted portholes with wire ring and plastic insert. Again, boot topping is lining tape.
Enjoy more Model Boats Magazine reading.
Click here to subscribe & save.
Salvage
Me, I’m not an engineer and, more to the point, am temperamentally unsuited to be one. If I make something and it isn’t quite right, instead of discarding it and doing the job properly I try to salvage it. It probably takes longer than doing the job again but that’s the way I am. Yes! I am a bodger. But I also aspire to scratch building so what hope is there for me? Well, while my methods will never get me a Gold at the ME, they might snatch a Bronze, or even on occasion a Silver if the wind is blowing in the right direction and the judges are overdue for an eye test.
I suspect that many of you, like me, aren’t up to the Brian King precision approach but we do have our artistic talents and a certain amount of low cunning. Look at it this way, if you photograph something then you have an accurate record of the subject. But if you paint it then, if you are a good artist, you can capture the essence of the subject without being absolutely accurate at all and that is what this article is about. I should make it clear that I am primarily talking about power driven prototypes. I haven’t tried period ship modelling yet although I suspect similar principles will apply to the wood and string brigade.
The first thing to consider is scale. If you build a model to a large scale then you’ve already made a rod for your back. When you model the deck it isn’t sufficient to just show the colour, you will probably have to show the texture as well, chequer plating for example. The larger the scale the more accurately you have to depict the detail, there’s just no getting away from it. The answer is to go for the small scale model where you can just show the deck colour and even manage without indicating the planking detail at all. The downside is that you may have to choose a prototype with 22 lifeboats, but that’s life and there are ways of mitigating this problem as I will explain later.
Going downscale brings about a number of benefits in that you can frequently “suggest” detail without having to slavishly reproduce it. The average observer is very susceptible to suggestivity so you can get away with all sorts of things if you are careful. The examples below show some useful short cuts. After all, why do things the hard way when you can cheat and nobody notices!
Subject matter
Some people like to have a go at miniatures. They don’t take up much room, you can work on them in a tray in the bath, and material costs are low. A popular scale is 1:1200 or 100 feet to the inch in old money. But beware! It is very difficult to do a decent job at this scale. It’s probably better to settle for 1:600 scale if you have a large prototype like a liner or something similar. Much easier to work on all round and material costs are still very cheap. There are lots of good plans around for this type of model. The old Model Boats range plus, more recently, John Bowens’s two books on Miniature Merchant Ships available from Conway Maritime Press.
Fittings
Much of the effort on a model ship goes into representing the fittings. They can make or break your work.
Portholes
Portholes on a larger type of vessel are exactly what the description suggests. A hole in the shell plating. Unlike your domestic windows, all the opening gubbins etc., is on the inside. Obvious really, you can’t have lots of outward opening portholes on the side of the ship where they might be wiped off by passing whales. After the era of welding there won’t be any features on the outside of the hull at all. Before then you might get a ring of rivets but that’s about it! But the average Joe expects to see a circular feature of some kind so why disappoint him? The obvious reaction to the need for portholes is to drill a series of holes in the side of the model. This has two main disadvantages. Firstly it is very difficult to get clean holes in correct alignment. Secondly, the thickness of the model hull is almost always greater than the scale plating thickness. I remember once trying to tackle this problem on a liner model by purchasing hundreds of small washers with the inside hole of the correct diameter and drilling larger holes to allow them to be stuck individually in position and levelled off with the side of the hull. It wasn’t successful and I now wear glasses.
Glazing
You now have the problem of glazing the things. If you put the glazing on the interior of the hull you get a sort of tunnel effect like a series of rabbit holes each with a window at the inside end. If you fill the cavities with transparent resin then surface tension means you don’t get a flat surface. If you try and insert small glazed disks then you will probably go mad. So what do you do? Well, if it’s very small scale get hold of some black or dark blue Model Technics Trimline or BECC lining and a rotary leather punch, punch out all the portholes you need and just stick them on the side of the model. Use masking tape to ensure that they are evenly aligned and you’ll never look back. The neatness of the positioning offsets the fact that they are actually stuck on.
If you are working to a larger scale then make up a soldered ring from thin copper wire to the required diameter and stick it onto the hull with Superglue. Then take some thin transparent polystyrene, paint one side dark blue and punch out disks of the required diameter to fit inside the soldered rings. Stick them in paint side down using a dab of varnish. The pictures show the effect. It may not be strictly accurate but most people will think it is.
Boot topping
Boot topping is another thing which causes people to bite their nails. Listen to the experts. First you mask off the top bit and then the bottom bit or is it the other way around? Me? However careful I am I always seem to get an uneven line with areas of paint bleed. I even managed to muck it up on my full size yacht! Take the short cut. Get the best line you can between the upper and lower hull colours then just stick lining tape in the appropriate colour over the join. Once it’s varnished the difference is very hard to tell visually. Of course you can detect it by touch but do you really want all and sundry running their grubby fingers over your pride and joy?
Deck machinery?
Complicated stuff. Needs a lathe really. But no, it doesn’t. The awkward bits usually comprise wheel like components. Buy some Airfix or similar tank kits and you’ll have all the plastic gears and wheels you need courtesy of Rommel’s Afrika Corps. It might not be dead accurate but if it’s small enough and painted appropriately nobody will notice the difference. I’ve actually been congratulated on the winches on my Granada model.
Lifeboats?
Horrible things! If you choose a small scale subject then you might have a lot of them. Make it easy on yourself. It’s not too hard to make a plug of the basic shape which you can cast in glassfibre or something similar. Paper mache works too. Planking can be added with thin strips of gummed paper strip, subsequently varnished. Fitting out? Well, on larger ships, except for an “accident” boat adjacent to the bridge other lifeboats often have canvas covers which are easy to model. You can then devote your efforts to fitting out the accident boat in the knowledge that you don’t have to produce identical fittings for all the other boats yet, subliminally, the observer still thinks they are there under the covers.
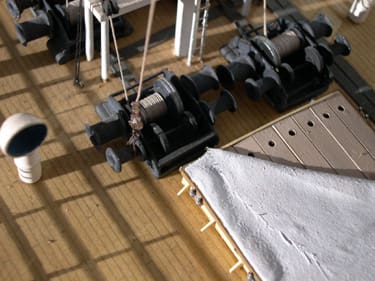
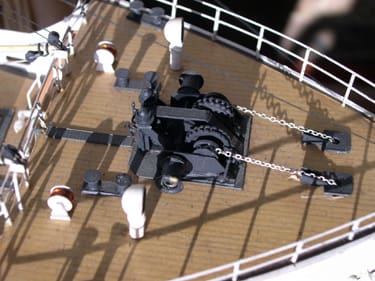
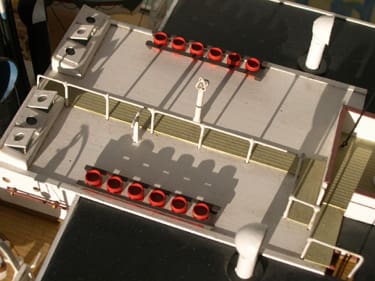
Pic 3 Winches on SS Granada. Airfix parts and eyelets for the winch drums. Pic 4 Windlass on Granada, more Airfix parts and eyelets.
Paint jobs
Just look at full size practice. The old QE2 is celebrated for her classic lines. But in fact the delicate curved sheer line is largely a painted illusion. Modern ships tend to be built without sheer in their upperworks and hull above waterline. The reason is purely commercial. If all the dimensions are four square then cabins can simply be prefabricated and dropped in. The old Queen Mary was a different kettle of fish altogether. Her decks had both camber and sheer so that every cabin had to be constructed individually. OK in the cheap labour days of the 30’s perhaps but simply uneconomic today. That is why ship owners use colour schemes to try and soften the external effect. On our models we can slightly raise the waterline fore and aft to accentuate the hull sheer effect. A bit of colour highlighting here and there can also enhance the attractiveness of the model.
Lateral thinking
Don’t make it if you can fake it. Years ago at the 49th ME Exhibition I entered my SS Granada model, not so much in the hope of winning an award as to secure free entry to the show. Sure enough the judges ignored it. The next year I also fancied free entry so entered the model again. The only difference was that I had added some fire buckets on the wheelhouse awning roof. Except that they weren’t fire buckets but toy pistol caps painted red and sand colour but otherwise straight out of the packet. The model was awarded a Silver Medal! Never has so much been gained for so little. We’ll gloss over the fact that a new judging team had just been appointed as that spoils the story.
If you get your brain in the right gear there are all sorts of everyday items you can put to use for modelling purposes. Haberdashery shops and departments are a particularly fertile hunting ground as are craft shops with lots of different beads and similar items. Likewise bits of old electronic gear or watches can yield useful components for your bits box. Be careful in haberdashery shops though. Among the useful modelling items are certain structural components of ladies underwear and too close attention to these, while undeniably educational, can invite unwelcome attention from the lady assistants. They’re always lady assistants of course.
Made your own propeller and it didn’t work too well? Never mind, just “lash” it down on the aft deck as a spare. Many merchant ships carried spare props in case the working one dropped off in some inconvenient corner of the world. It adds a nice scale flavour to the model and your work in making the useless device won’t have been wasted.
Real rudders hang on pintles attached to the stern post on period steam merchant ships. This would be a bit vulnerable from the modelling viewpoint so just support the rudder vertically in the usual, way and add some pintle looking fittings in the appropriate places which don’t actually connect with each other. Nobody will give them a second look.
Hull plating
If you are working at a small scale then just simulate the hull plating with strips of gummed paper on the side of the hull subsequently varnished over. It will look as if the hull has been plated. Impregnate the paper with Cascamite/ Extramite glue, or whatever it’s called these days, instead of just plain water to lessen the risk of it coming off. Actually the glue on gummed paper is pretty tenacious and when it dries it contracts slightly giving a nice tight surface for further finishing. Dope or sanding sealer is good for this.
Rivets
Only anally retentive types add individual rivets at small scales. Forget it!
Decks
At small scales you can usually get away with light pencil lines on suitably coloured paper overlays subsequently varnished. Don’t make them too yellow, a subtle cream looks better and will darken anyway when you varnish it.
Fittings generally
If it looks complicated and is neatly executed then people will be impressed even it it’s totally inaccurate, not that I’m suggesting that any respectable modeller would even dream of going down this route. Put extra effort into a noticeable feature. One of my earlier models was a North Sea ferry, the Bardic Ferry – may still be in the Model Boats plans range and is an attractive prototype. It featured a very prominent crane on the aft deck, lots of filigree girders, you know what I mean. Just about then, Plasticard was being introduced (well, it was a while ago) so I built the crane out of Plasticard strip and I have to admit that it did look quite impressive in its day. So impressive in fact that everybody who saw the model seemed to zero in on the crane. I’m sure it got the model lots of extra brownie points in competitions and distracted attention away from less well executed parts of the ship.
Experiment with unusual materials
Much is made of the virtues of sheathing your model with glass fibre tissue and resin to add strength and watertightness – which it does. Trouble is that it’s a so and so to rub down to a smooth finish, Glass paper on glass fibre so what do you expect? However, if you use nappy liner tissue instead of glass fibre tissue then rubbing down is a doddle although the functional effect is exactly the same. It’s best to employ unused nappy liners of course and the risk of funny looks when buying them is less than you might get in a haberdashery shop. Don’t buy Pampers disposables by mistake as your model might look as if it is permanently sailing in a fog bank.
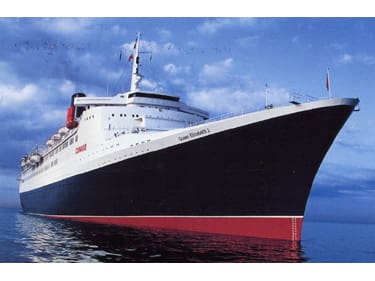
Pic 5 Lifeboats on Granada model. The funnel is a couple of 35mm film canisters stuck together and covered in waterproofed paper. Pic 6 “Suggestivity“ on QE 2. Note in particular the uplift in the promenade deck line just behind the bridge but the windows are straight. Also the way in which the black lower hull paint line rises towards the bow. In this shot the ship appears to be trimmed by the stern.
Practicalities
Many of us like working models but shy away from the practicalities. What types of hull work best, which motors should I use, which battery is appropriate, how many working functions do I need?
If you haven’t done it before then these are all serious questions which come up again and again, just check the Model Boats Website Forum if you don’t believe me. On second thoughts, check it anyway, there’s a treasure trove of practical information there which anyone can learn from. For those of you who aren’t connected, (and for those of you who are!), there are several good books available on scale modelling. Look at the adverts in the Model Boating Magazines.
Prototype
The first thing to think about is choice of prototype. If you choose one with a long thin hull with lots of top hamper then you are simply storing up trouble for yourself. Unless you can build the upperworks really light the boat will be crank or, worse, may prefer to float the wrong way up. We’ve all seen models on the pond which, when rudder is applied, almost capsize.
A racing yacht looks magnificent with the lee gunwale under and most of the crew perched on the weather side with their legs dangling but a destroyer looks a bit unrealistic laying over on her beam ends every time you make a course correction. Showing all the crew hanging over the side simply demonstrates that your cack handed building has made them all sick! That is why many of the kits you can buy make extensive use of Plasticard for their superstructures. It’s very light and easy to work and in some ways is an ideal material. But you do have to question its longevity. When you visit a maritime museum you can see models a couple of hundred years old in quite reasonable condition. They are of course constructed in traditional materials.
I have a friend who built an award winning model in the mid seventies. It really was superb and took full advantage of the then new plastic sheet, strip and rod. Thirty years on he informs me that it’s falling to bits as the plastic has self destructed. Modern versions of Plasticard may be better but anything based upon petrochemicals must be suspect in the long run. I do use Plasticard to some extent, don’t we all? But I prefer to use very thin ply despite the extra overhead needed to finish it. Also, wood is pretty stable with temperature changes. My old Bardic Ferry had a Plasticard aft deck. If I left the model in the sun it would expand and bow up quite alarmingly, returning to it’s normal dimensions as the temperature dropped. I used to leave it in the shade under a tree at regattas but the birds….
Choose a prototype with a reasonably full hull form and you will have sufficient buoyancy and stability in hand to make up for a bit of unintended weight gain in the superstructure. That’s why tugs are such popular subjects. You must be a pretty abysmal modeller to build an unstable tug! When you are constructing a working model there is a limit to the extent to which you can build light before the upperworks crumble when somebody sneezes on it. The danger is that if you do build it too heavy there isn’t much you can do to recover from the situation. Of course you can attach a strip of lead to the bottom to restore stability but this might be at the expense of raising the waterline so the boat looks waterlogged on the pond. Might be OK if you’re building the Titanic but not otherwise.
Many people like to build warship models. After all, you can paint them the same colour all over can’t you? Well, yes, but warships, particularly the more modern varieties, tend to be quite complex subjects to reproduce and very often feature large numbers of similar fittings which means you have to ensure that they all look the same on the model too. The Battleship HMS Rodney had three main turrets and six secondary armament ones, quite bad enough you might feel. But the WW1 battleship HMS Agincourt had no less than seven main battery turrets. It was said that every time she fired a broadside observers though she had blown up. Nobody following Dave Wooley’s excellent articles can be in any doubt whatsoever that modern warships are very complex subjects indeed. Some of the older ones are OK though.
You will generally have more options if you choose a merchant vessel and you can pick one you feel most comfortable with. My Granada model has only four lifeboats and not too much duplication of fittings with the exception of the winches. So I didn’t get too bored making all the fittings as would have been the case if I’d chosen the Queen Mary with her 24 lifeboats and 2,000+ portholes. I’m a modeller, not a masochist.
Don’t take things to extremes
As a boy and broke as far as paying for modelling materials were concerned, I hit on the idea of constructing a 4 foot model yacht hull in aircraft fashion. A set of ply bulkheads supported a spruce framework of stringers over which I stretched doped model aircraft tissue. As an example of getting the biggest hull for the minimum of materials it was hard to beat. Trouble was that every time I picked it up I put my thumb through the hull. Another glorious failure. Still, I’d never have got it on the bus anyway. I remember that it was about this time I got fed up with stirring the paint in Humbrol tinlets and attached a bent wire extension to a spare motor to make things easier. Nobody warned me that you really needed to insert the stirrer into the can before switching on. My father was not amused by the horizontal streak of paint across our back door, the kitchen window, adjacent wall and my best pullover. There was nothing left in the tin either.
Motors are always a tricky point
There are lots of cheap bargains available but which is best? Most smaller models, say up to around a meter long, will use one or more 500 or 300 type motors. Most readily available motors are often of the high power high consumption type and are unsuitable for scale models unless your idea of fun is for your lovingly crafted battleship to take off across the pond on the plane at a scale 100+ knots and after a couple of minutes slump back in the water in exhaustion necessitating a two hour wait while it drifts in to the most inaccessible part of the bank.
You need the low consumption type motors and ideally these should be geared down in some way. This gives you more options when it comes to propeller size and pitch. My advice is to check the supplier adverts in Model Boats which now often say what type of boat their motors are most suitable for. If in doubt contact them and ask. You’ll almost certainly get a helpful reply, they don’t want to sell you something unsuitable. Gearing is quite important as almost all motors run too fast for the props you attach. A reduction of 2.5 to 1 is usually a good rule of thumb. It allows the motor to develop optimum revs and reduce power consumption without compromising on speed.
Some motors come already fitted with gears or you can buy separate gearboxes. Bodgers like me favour pulley drive as the operating tolerances are greater. Pulleys are readily available and the drive bands on smaller models can range from ordinary elastic bands, preferably doubled up with twin pulleys or commercial items such as cassette or video player driving bands which are available from Maplins or elsewhere. O rings are also available in a wide range of sizes but are less elastic and benefit from the operating configuration being as circular as possible. As soon as you try to stretch them into an ellipse the resistance goes up exponentially. The thick ones are the worst, get the smallest ring cross section you can..
Of course you can buy gear wheels instead but if so they need to be an exact fit on the motor and prop shafts and then you need to have some way of making very fine adjustments to the motor position to ensure that the two gearwheels mesh efficiently without binding or being too loose. And that sounds perilously close to engineering which isn’t what we are about!
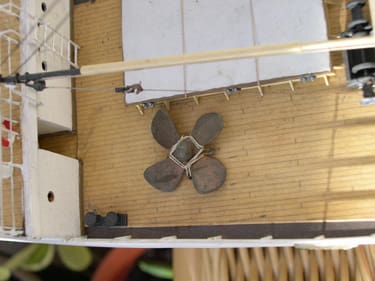
Pic 7 Explosive fire buckets on the Granada model! Pic 8 Home made propeller lashed down!
Propellers
The choice of propellers for scale models is vast so you should be able to find something to suit without any difficulty. However, bear in mind that many plastic/nylon type props, while giving good ahead thrust, can be pretty useless when going astern. This can result in certain practical handling problems with the sharp end of the model rapidly becoming blunt. I have found that the astern performance of the red Graupner props can be transformed if you dip them into boiling water and tweak the pitch with a pair of pliers. Of course they are still bright red though. I have tried painting them with bronze coloured paint but it doesn’t last all that long. Generally I find that the brass screws from various manufacturers give a better overall performance and look more realistic.
Position
When you are scratch building it is up to you to sort out the position of the running gear. I scaled my Granada model up from a 1:600 waterline plan which meant I had to draw the underwater hull lines myself. I did a reasonable job of this but made the mistake of fitting the propeller shaft around an eighth of an inch too high.
The ship had a counter stern and the prop was not sufficiently deep in the water which meant that full ahead or full astern resulted in lots of water being thrown about but not much forward or reverse motion. Fitting a smaller prop helped to some extent, but not quite enough. In the end the only solution was to add more ballast so that the model floated fractionally below the indicated waterline. This improved performance no end. I got away with it because on the pond there are always waves and the boot topping still showed up clearly, disguising the fact that the model was a little bit lower that it ought to have been. Bodger triumphs again!
Batteries
As far as batteries are concerned the main choices are Nicads, Nickel Metal Hydride and Lead Acid Gel Cells. For scale models Gel Cells tend to be the preferred choice these days. A possible alternative is the Cyclon cylindrical lead acid types which, although more expensive, offer more tolerance to neglected charging. Look at the Maplins catalogue and you will find something suitable for your boat. There’s usually lots of choice at the various model shows too if you know what you are after.
Extra functions? and R/C
This is a matter of choice. Obviously you need steering and speed control. Anything over and above this is personal preference depending on the facilities offered by your radio gear. I have recently bought a Futaba 6EXA for a twin screw model. Wanting independent control of the motors I first tried a mixer but it wasn’t really sensitive enough to give me the control I wanted which was to group the motors together for normal sailing but operate them separately when docking etc.
After some experimentation I discovered that I could use the “landing gear” toggle switch on the TX to switch between group and independent motor control. This entailed fitting a relay switch in the boat on channel 5 which replicates a “Y” lead connection controlling both motor speed controllers from the left hand stick in one position and reverts to independent control on both sticks on the other. Thus by the flick of a switch I can change the motor control configuration. Well, it works in the bath anyway.
Whether you want to add additional RC controlled features rather depends upon the nature of the prototype. People who build tugs like to fit working fire monitors to soak onlookers while those who build warships sometimes seem to have more sinister objectives although I have yet to hear of a spectator actually being shot. Come to think of it, a long time ago at the Naviga championships at Welwyn Garden City I do remember an unfortunate individual having his jacket set on fire by a pyrotechnic fired by a model warship. Happy days!
Radio these days is largely fit and forget, but you should always exercise good practice. Our illustrious Editor’s book “Radio Control in Model Boats” is a mine of information on the subject and has recently been updated. Follow the recommendations and you can’t go far wrong. I would only add a comment on aerials which can sometimes be a problem on scale models. You can conceal them in the superstructure and it does work but must inevitably reduce effective range to some extent. I like to put them on the outside of the model where possible, ideally with a vertical run. After all, transmitters are usually held more or less upright and it helps to have at least some of the receiver aerial in the same orientation.
If your model has got two masts then run the aerial up the foremast and across to the mainmast. Don’t use the wire coming out of the receiver though as it is too unscale and your boat will resemble a section of the National Grid. I use the very thin enamelled copper wire used for winding coils etc. available from Maplins and other suppliers. It’s almost invisible and you can run it all over the place without spoiling the appearance of the model. Put some concealed spring tension on it inside the superstructure to keep it taut.
Remember that the total aerial length must be the same as originally supplied with the receiver (it’s tuned to this) so if you cut the supplied wire make sure that the total length is still the same, tucking any excess away in the superstructure if necessary. Use a gold plated connector if you need to detach the superstructure carrying the external section of the aerial. the Another thing to remember is that if you string thin wire above decks it is likely to get broken at some time so fit it in a way that it can be easily replaced if necessary.
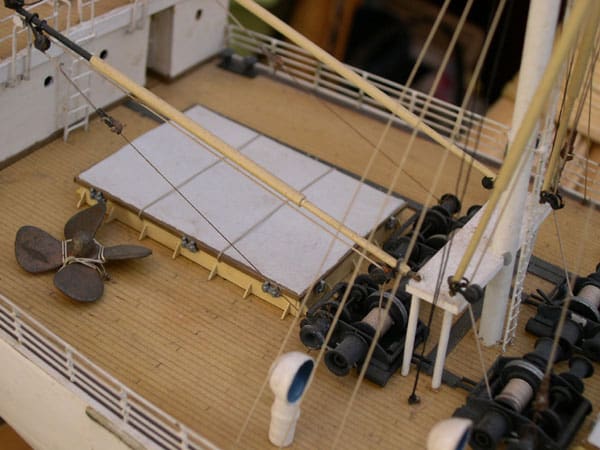
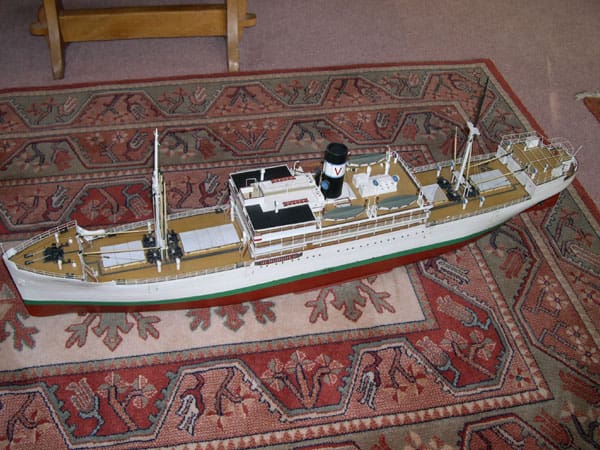
Pic 9 Aft deck of Granada showing deck machinery and spare propeller. Pic 10 General view of SS Granada model. Almost exactly 1 metre long.
Handling
Handling is something of a black art. For no apparent reason some boats steer better than others. I’m told it’s the same for full size vessels too. Some time back I built an Imara tug kit for review in this magazine. It had twin screws and a large rudder to which it paid very little attention. Turning was more a matter of celestial orbit than radius. The only way I could control the thing was by operating the motors independently.
A subsequent version of the kit featured a single screw which suggests that I wasn’t the only one to experience the problem. Funnily enough, the best steering boat I ever built was a 1890’s liner, Dunottar Castle, in stand off scale with a length of 35 inches and beam of 4. It had a full hull form with a single propeller and was a dream to handle. It gained quite a few steering competition awards. In fact it was so good that when the superstructure became a bit battered over the years I rebuilt it as a tramp steamer on the same hull to a larger scale and it is still in running order 25 years later.
Wanting to go one better I built another 1890’s liner standoff model, Empress of Japan, with twin screws which looked great but was a total failure as far as steering was concerned. It just goes to show!
Nothing is certain
In boat modelling, as in other things, nothing is certain. There is forever something to learn and frequently when we think we’ve mastered it we are confounded once again. Still. That’s the attraction of the hobby. There’s always something new and the possibilities are infinite. So many possible projects – so little time. Hopefully these notes will have provided a bit of advice and food for thought and convinced you that you don’t have to be an engineer to successfully scratch build. Now, do I go back to the drawing board or try and finish the model on the stocks?

