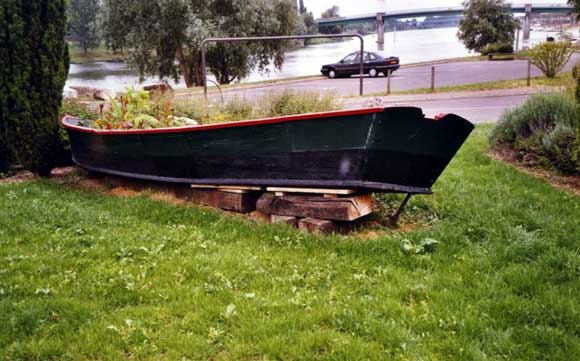
I spotted it on a roundabout in France whilst exploring Burgundy, both the countryside and the wine. There it was, an old wooden river skiff, nicely painted and partly filled with soil and planted with flowers to make a display in the centre of the roundabout – such indignity! Camping nearby, I was soon walking back to take a closer look, Photo 1. All over Europe there are fewer and fewer remaining examples of traditional wooden working boats. When I see one, I like to record my sighting by taking photos and, as in this case, making sketches of interesting details. Sometimes this is with a view to making a model in the future and at other times it is just to make a record, perhaps with a view to preserving something for posterity.
What I liked about this boat was its sleek elegance in a simple and functional way, the unusual construction and the bold green and red colour scheme. The bow also has an attractive curve to it, which for me, just adds a nice touch.
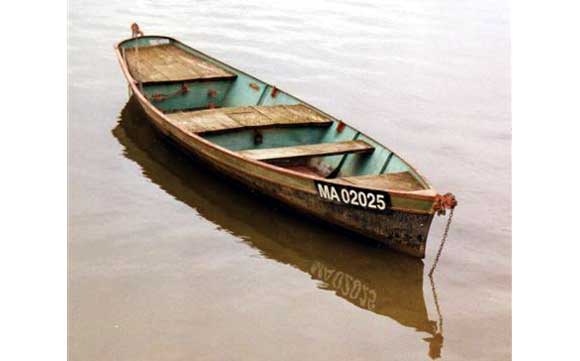
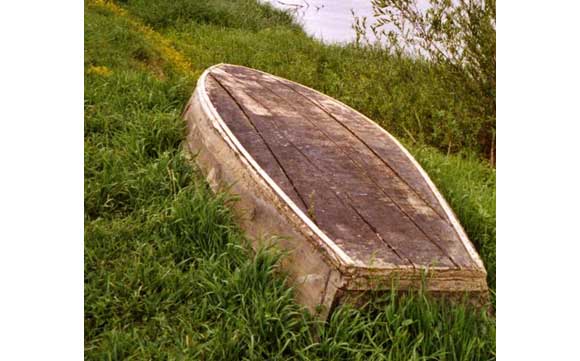
The roundabout with the boat in its centre was in Tournus, a town well worth visiting on the River Rhone, one of France’s massive rivers. A short walk down to the river bank revealed three more boats of the same design. All were very dilapidated; two were afloat and one was upside down rotting on the bank, Photos 2 and 3.
Eight years went by before I decided to make a model. It is only 5 inches long, which is just large enough to include the distinctive details and make a very attractive little model. From the original photos and sketches, I made a lines drawing with plan, elevation and cross sections, Photo 4. The almost flat bottom of the boat was first constructed by laying lime planks of equal length side by side together. All the planks were cut over length and the assembly was wider than the finished size. The unusual construction of this boat was in the way the side planking sits down on to the bottom planks, with a quadrant shaped fillet fixed externally to cover the joint. Therefore in making the model I could gently force the bottom planks into the slight curve, by wedging and clipping the planks with a rigid base board below. Because the planks were all of equal length at this stage, they took up the slight curvature equally. The side planking was then built up on top of the bottom planks using PVA glue, having the effect once set, of keeping the bottom planks in the desired bow to stern curve. The little external fillet was added, strengthening the joint between bottom and side planks. Only after this stage were the bottom planks trimmed to the hull shape and the model began to look like a boat. This was of course a very simple and quick method of construction, a matter obvious to the French boat builders. I suppose this method copies that used in an ordinary punt which also has no keel. The thwarts, bow planking, central fish compartment and stern seat were added and the boat painted. For the rowlock holders, some ordinary electrical flex was used. When the insulation was stripped, a short 2mm length of wire was left exposed as a Thole pin and the flex cut to about 3mm. This was glued to a rectangular piece of brass cut with scissors from a waste piece of sheet. After being painted red, four of these assemblies were glued to the boat.
Enjoy more Model Boats Magazine reading.
Click here to subscribe & save.
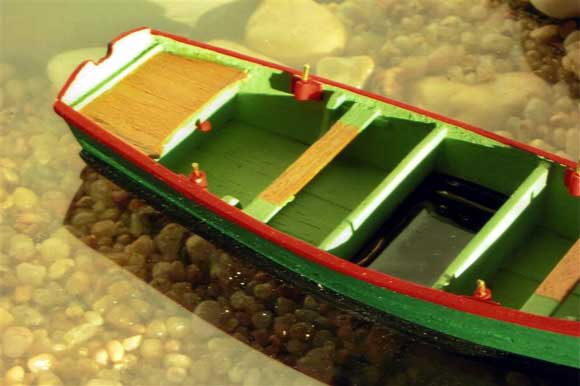
A feature of these boats is the fish tank, a compartment in the centre with holes in the bottom planks to allow it to flood with fresh water to keep the fish alive. Iron staples over the holes stop the fish from escaping. In France for example, they like to keep eels alive right through to the kitchen and to kill them only as they are about to cook them to retain the flavour. These boats would have been used to catch other river fish as well such as pike and sturgeon, and the campsite owner showed me a photograph of two Englishmen who came every year to fish, holding up one they had caught that was at least 8ft long – yes really! The fish tank compartment on my model was flooded by first blocking off the holes in the bottom with masking tape and then pouring in a small quantity of ‘Solid Water’, a clear resin mix available from model railway shops. The result adds to the realism of the boat, Photo 5.
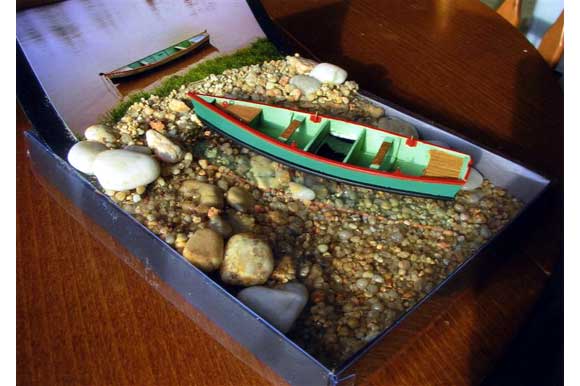
I now had an attractive model, but it needed to be set off nicely. A Christmas card box about to be thrown away gave me an idea for a boat to be ‘floating’ on the cellophane lid. Using some beautiful stones that were in stock and I had collected from the beach, I was able to make a riverbank scene. Those stones below the water were set in ordinary building cement, reinforced with two hook ended lengths of coat hanger wire. After setting, these stones were sprayed with gloss varnish to make them look wet. Those stones above the water, i.e. on top of the cellophane were set with PVA glue in the form of a curved beach, and a photo of one of the old boats set in as a backdrop. A coat of black paint obscured the printed matter on the box, Photo 6. The boulders in the mix of sand and gravel, are at a scale size of about 4ft to 6ft across. The contrast between these great boulders and the fine lines of the boat make a dramatic visual impact.
It never occurred to me that I might have filled my model with some soil, planted some miniature flowers and set it on a model roundabout – even I would not stoop as low as that!
So, my pristine little river skiff is just hauled up safely at the river bank, Photo 7. I am delighted to have achieved a miniature record of a fast disappearing type of boat, in a roundabout way!

