Focus on Scale June 2010
DAVE BRUMSTEAD with a regular look at the scale scene
 Article continues below…
Enjoy more Model Boats Magazine reading.
Click here to subscribe & save.
Welcome to this month’s Focus on Scale. This month we will be visiting a model railway and hobbies exhibition (to look at the model boats!), having a look at the club stands at the 2009 Model Engineer Exhibition at Sandown and revisiting an MB kit review of the Model Slipway Trent lifeboat.
Shoeburyness Annual Festival of Models and Hobbies
This event is primarily a model railway show, but model boat and aircraft clubs also attend. On the marine side the local Southend Model Power Boat Club were in attendance as were Moorhen MBC from Harlow.
Some railway clubs incorporate model boats into their dioramas including a rather spectacular one by the Leamington and Warwick Model Railway Society. More on this in a moment, but to one side of it was this version of Dean’s Marine HMS Amethyst, a modified Black Swan class frigate, Photo 1. The Deans Marine kit to a scale of 1:96 scale, is 985mm long with a beam of 114mm and this model was built by John Mead. Article continues below…
The full size HMS Amethyst took part in what was to become known as ‘The Yangtze Incident’ when in 1949 she sailed from Shanghai up the Yangtze river in China to Nanking so as to relieve HMS Consort as guard ship and to help evacuate the British community during the Chinese Civil War. HMS Amethyst came under heavy communist fire from shore batteries and 37 crew including the captain were killed or seriously wounded. With the ship now aground, HMS Consort made an attempt to reach HMS Amethyst to tow her off but was repelled by the shore batteries, but eventually she refloated herself and anchored a little further upstream. HM ships London and Black Swan also attempted to reach HMS Amethyst sailing from Shanghai, but were forced back by heavy gunfire with 15 killed and 20 wounded. HMS Amethyst remained trapped for ten weeks without supplies. On 30th July the ship slipped her anchor and headed downstream for the 104 mile dash to the open sea whilst under fire, but safely escaped reaching the mouth of the river and made the signal; ‘Have rejoined the Fleet south of Woosung. No damage or casualties, God save the King’. There was less than seven tons of useable boiler fuel left. HMS Amethyst finally arrived in Hong Kong on 11th August 1949. This is a very brief summary of the incident of which a film was made in 1957.
The club’s railway diorama, Photo 2, represents a dockside on the South Coast of England with preparations during WW2 for Operation Overlord, the D Day landings (this picture was taken during show set up, hence the boxes in front of the display). In the centre of Photo 3 is HMS Grenville, another of John Mead’s models which is also radio controlled. Photo 4 is of an original Matchbox corvette kit with Airfix MTB’s alongside and Photo 5 shows a landing craft being loaded. (This display was also at Brighton Modelworld early in 2010 and is really first class – Editor)
On the Moorhen MBC stand was this Graupner Ranzow, Photo 6, built by Allen Storrar and owned by Chris Brookes. The full size Ranzow was built for the transportation of equipment and materials and looks after the maintenance and replacement of navigation buoys. It has a hydraulic crane on deck and the mast and searchlight can be lowered to enable the vessel to pass under low bridges. The draught is just 1.75m and her length is 32m with a beam of 8.9m. She is fitted with twin propellers, Becker rudders and bow thrusters. The Graupner model is to a scale of 1:32 which equates to a convenient length of 1000mm, beam 270mm and draught of 55mm. The hull is ABS, as is the superstructure and bridge, and the kit contains all the necessary wooden parts, propshafts, rudders and fittings. Two Graupner Speed 500E motors are recommended for propulsion. A bow thruster is also required and other functions maybe added, such as a Crane Expansion Set which enables that feature to function. Article continues below…
Keith Henley was displaying his Severn lifeboat, Photo 7, which had been purchased from the RNLI complete with radio control. Upon opening the model, Keith’s modifications could be seen, Photo 8. The model has been converted to ‘proper’ radio control with twin 260 drive motors, a Hitec receiver and an Mtroniks Viper 15 amp esc.
On the Southend MPBC stand was this fine model of an American Mississippi tow boat, Photo 9. Colin Sharp’s scratchbuilt model is built to a scale of 1:32 and was just one of a range of models on display on the club stand. The Shoeburyness Model Railway Club has their annual festival of model railways and hobbies at Garon Park Leisure Centre, Southend during November of each year and it is a nice multi-disciplinary event to visit at the end of the ‘warm’ model boating season.
2009 Model Engineer Exhibition, Sandown Park.
Article continues below…
By the time you read this, Colin Bishop’s report on the competition classes will have been published (MB, May 2010) but here I am looking in particular at the club and society stands and some of the models on display.
There was an excellent series of articles within the pages of this magazine in 2009 on steam by Richard Simpson, and a few photos of some of the steam boats and engines at Sandown Park may be appropriate. Photo 10 is of a display on the St. Albans and District Model Engineering Society stand which featured three unique steam engines.
Starting from the left, we have a twin cylinder double acting steam engine with a bore of 0.325ins and a stroke of 0.60ins intended for driving paddle wheels. The information provided stated that the oscillating cylinders were mounted vertically under the crank (or paddle) shaft in common with full size practice. This unit is designed to have a gearbox between one paddle and the engine to allow the paddles to rotate in opposite directions for tight manoeuvring.
The centre engine was a three cylinder, single acting oscillator designed for use in a paddle steamer, again with the cylinders under the crank. The flywheel is fitted to give smooth slow running when used for exhibitions, but would not be required when driving paddles. Both this engine and the last one on the right, rely on steam pressure to hold the valve faces together so springs are not required.
This third engine is a single cylinder, single acting oscillator with speed and direction being controlled by rotating valve shaft. All three engines were designed and constructed by Malcolm Beak, a steam notable.
Photo 11 is of a marine side lever engine built by Fred Bearton for his model of Sirius. The full size vessel sailed from Cork in Ireland to New York in eighteen days and ten hours in April 1838. The vessel was originally built for the London to Cork run and was a timber built ship of 700grt. This was also a rather nice way of showing how the engine would fit into the model.
Also on the St. Albans and District MES stand was this model of a south coast paddle steamer by Jim Isaac, Photo 12. The model is scratch built from MyHobbyStore plans to a scale 4mm to the foot (00 gauge). The model is built from plywood and balsa with an external keel for added stability when sailing. A 6v battery provides power for the electric motor drive.
The Victoria Model Steamboat Club has always supported the Model Engineer Exhibition with a good variety of models on their stand, Photo 13, and not just steamboats. On the left of the picture are two versions of the well known Aerokits Crash Tender.
Phoenix Marine Model Club have supported the Model Engineer Exhibition in the past and had a decent display again on this occasion, Photo 14. The model, bows on in the centre, is De Groene Draeck which won a silver medal in 2007. As can be seen from the picture the club members operate a variety of scale boats as well as novelty vessels and yachts. The club has its own sailing water in Surrey and club contacts can be found on their website: www.pmmc.org.uk.
It was very pleasant to meet Martin Ranson again at the show. A regular visitor to the now defunct Primrose Valley Modellers Week (since replaced by the Thornwick event), Martin has also contributed to this magazine in the past. A medal winner in previous years, his steam launch Florence was entered in the competition classes this year. He had also supplied a display of many of his models, some medal winners from previous years, in the club area of the show and Photo 15 is of his steam launch Julie Anna. The engine design is unusual and is perhaps based on a beam engine? A single piston and two connecting rods drive contra-rotating gearwheels, these turning the two propellers. The hull is a freelance design, based on an original and the model was a medal winner in 2004. Little Emmy, a silver medal winner in 2007 is in Photo 16. Note the cat just behind the engine complete with Xmas hat! Martin was also exhibiting various jigs and information for the construction of plank on frame open launches, Photo 17.
Other clubs were exhibiting on the upper floor and amongst them was the Guildford Model Engineering Society’s stand which won the Best Club Stand Award. I noticed the stand primarily because of this model under construction, Photo 18. On closer inspection I found it to be a model of a Norfolk Broads Sailing Yacht, being built by Peter Shires to 1:8 scale. The full size vessel, seen in Photo 19, is one of the Hunter’s Yard fleet, namely the Lullaby Class, website: www.huntersyard.co.uk. This is also the home of the Norfolk Heritage Fleet Trust from whom the plans were obtained.
The notes state that the model hull was built from 110 strips of real hardwood with 42 bamboo ribs, each rib split from a cane and shaped to fit the hull. My personal memories of these full size boats go back to 1969 when I worked for another boatyard at Wroxham and we had a sinking at Acle Bridge at 6pm on Easter Sunday. That boat was virtually identical with the exception of it having a Stuart Turner auxiliary motor.
It was good to see model yachting fully represented at Sandown with the MYA putting on a display of all their types of yacht, from Footies up to Marbleheads, Photo 20.
Well, that concludes our visit to the show. Since it’s moved back to Sandown it certainly seemed to be better attended and with a better consumer friendly layout than in previous years.
Kit review revisited
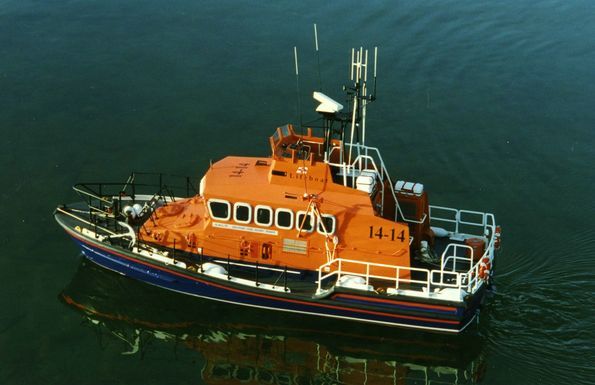
This month I intend to cover Paul Freshney’s 1998 review of the Model Slipway RNLI Trent lifeboat. The original review ran over two issues with 64 pictures, so this will be somewhat truncated to fit in the space available!
The kit is manufactured to a scale 1:16 giving an overall length of 918mm, beam 317mm and an all up weight of approximately of 8kg. The kit is now one of the Model Slipway Classic Range and retails for £284, a modest increase of £16 in twelve years! I may be mistaken but I believe this was one of the first regular production kits to feature etched brass fittings, Photo 21. These are in addition to a well moulded GRP hull, eight sheets of die cut styrene, four printed styrene sheets, white metal fittings, vac. formings and rubber for the fendering. A stand is also included plus the usual plan (two sheets), instruction book, parts list and printed transfer sheet.
Before building commenced, a sturdy building stand was built using the supplied profiles. This was so constructed to ensure the model’s waterline was parallel to the bench, something that Paul always does, even today. This makes it easy with a set square to ensure that parts that should be at right angles to the waterline, indeed are at right angles!
To ensure the hull was fully rigid, Paul fitted the deck, Photo 22 before installing the running gear, Photo 23. Why? Well if propshaft tubes and A frames are installed before a hull is fully rigid, it is sod’s law it may then twist very slightly, possibly ruining alignment. The other reason is that if everything can be installed through the deck openings, then later access is guaranteed.
The joints between the ribs and hull sides were reinforced with David’s Isopon fibreglass filler, likewise internally where the propshaft tubes exited the hull. The drive motors with belt reduction gear boxes were then installed as well as the r/c gear which were all mounted on fibreglass r/c car chassis sheets. The motor mount was screwed to wooden blocks bonded to the hull and the r/c mount ‘hangs’ on brackets inside the coaming. Photo 24 shows the r/c and motor layout (I still possess the 1992 Fleet esc which works just fine. The funny little red thing was an alarm which if there were no Tx signal was useful if one left the receiver switched on unintentionally – Editor). The advantage of this mounting method is that the motors and r/c can all be easily removed for maintenance when required.
Deck furniture was prepared next, using scrap styrene for bases for some of the fittings which can aid positioning and help prevent glue going everywhere.
The cabin and flying bridge were next to be built and Paul made the point that access to the cabin interior was not possible once the whole superstructure is completed, so he modified it slightly to gain access by having a removable centre section of the floor. Photo 25 shows the cabin inner ‘tray’ complete with seats but not yet glued in place. The basic outer cabin box was built next and Paul stated that the die cutting was accurate and the instructions give the required measurements. Care must be taken to ensure the sides sit on the deck with no twisting and the top edges of the cabin are parallel to one another and at the same height. He found it best to build the front lower cabin almost as a separate entity. Photo 26 is looking at the rear of the cabin, and Photo 27 shows the front cabin being assembled. Photo 28 shows the various hatches and etched brass fittings in place, but not yet glued. Photo 29 is of the model on the water, just to give you an idea of what it looked like, but as with the original review, Part Two will be in the next issue!
That’s all for this month, if you wish to get in touch, please do so via the Editor or please email: [email protected].
Main interest is scale scratchbuilding but I build kits as well! I live in South West Surrey near the Sussex border

