Finishing Fibreglass
RICHARD SIMPSON with some useful suggestions
Enjoy more Model Boats Magazine reading.
Click here to subscribe & save.
Be it good or bad, I think it is safe to say that kit models considerably outnumber scratch built boats on the pond nowadays and of course a very high percentage of these include a fibreglass hull and possibly superstructure units. It sometimes surprises me just how many times I notice bare fibreglass inside a model, Photo 1. This can even be on external surfaces (such as the exposed inside of bulwarks) and can significantly spoil the overall appearance of the model, Photo 2. I would therefore like to suggest one or two methods for simple yet effective fibreglass finishing that we can all do to improve such a model with not a great deal of effort.
I should also say that fibreglass is sometimes written as fibre glass or as glass fibre and I have settled on fibreglass, but all three would seem to be commonly used. Another term, GRP, means Glass Reinforced Plastic, with the plastic in this case referring to the polyester in the resin and this is another term often used when referring to fibreglass mouldings. Then you can have GRE which is Glass Reinforced Epoxy to make life even more interesting!
Anyway, I think it is probably easier to split the suggestions for finishing fibreglass into two areas and they are for internal and external surfaces, so let’s consider internal surfaces first.
Internal surfaces
The first question that most people would ask and the reason why so many don’t seem to bother is: ‘Why?’ One reason for me is purely aesthetic and no more than wanting the internal areas of your model to look as good and well made as the external surfaces. The second, and probably more important reason, is that it is a lot easier to keep clean. Steam plants tend to spray around varying quantities of water and oil, all of which will end up coating the internal surfaces of your model which can look a mess and even electric installations can sometimes generate mess when motor bearing oil or propshaft tube oil are sprayed around the inside of the hull and mixed with general dirt and motor brush dust. Rough fibreglass absorbs this mess very effectively and is particularly difficult to keep clean, so improving the internal surface of the hull is worthwhile.
The options here vary considerably from a coat of paint to a complete overlay of matting and resin, but I think it is reasonable to say that a good 90% effect can be achieved by minimal effort. Before doing anything else, there should be a thorough clean of the internal fibreglass surface with a regular solvent such as thinners and you may well want to just lightly rub over it all with a piece of sandpaper as well. This not only removes the really high spots but it also helps key the surface for whatever is going on next. Some modellers also fit the internal structures such as a framework, motor and battery mounts etc., and then coat the entire insides in one go. Your first consideration is how rough the surface actually is as supplied. If it is particularly rough I think the first suggestion would be to paint the internal surfaces with a coat of resin and Photo 3 shows what is commonly available in UK car body shop suppliers and can be purchased in varying size tins and consists of the fibreglass resin itself and the hardener, usually a thin foil pouch containing a red paste (the body filler is in the black tube). You simply pour the amount of resin you require into a receptacle such as a tin or other suitable container, Photo 4, and add the required amount of hardener and mix thoroughly, but also quickly. Some types of plastic container can be quickly dissolved by the resin and do not use a glass jar as the significant amount of heat generated when resin cures can break the glass. You will only have in the region of fifteen to twenty minutes or so before it starts to set, so don’t make up so much that you are not able to apply it in time and hot weather will accelerate the process.
Consequently, preparation of the work space is very important as you don’t want to be turning the workshop upside down looking for the paintbrush as the resin is curing in the tin. Brushes can be cleaned with varying types of usually expensive and not easy to obtain volatile solvents such as acetone, but vinegar will also work although one option, and my own usual choice, is to use a very cheap brush and throw it away afterwards. The resin can be thinned with such solvents as Isopropyl Alcohol but once again they are very volatile, not the easiest to obtain, generate powerful odours and as the resin is of an easily paintable consistency it really isn’t worth it for this purpose. It is a lot easier to try to get the whole job done in one go so a big brush and working fast may well be the order of the day. Once the surfaces are painted with the resin leave it to cure.
One point to remember now is that the resin actually cures in the absence of oxygen so they tend to contain a wax that sits on the surface as they cure. This will then affect the ability of any paint to adhere to it, so it then needs a good wipe over with a thinners or even a soap and water wash and I would always suggest a good rub down with a wet and dry paper of round about 400 to 600 grit to key the surface ready to take paint. From this point onwards, whether you have painted with resin or your original hull is good enough, it is simply a case of a couple of sprayed coats of primer then a top coat of your choice. Primer can be once again be normal acrylic primer from the car body shop, but you must ensure that whatever you then use as a top coat is compatible. As always, if in doubt do a test on a small area to be sure. For my steamer hull internal surfaces I simply sprayed a single coat of primer and then painted three coats of radiator enamel over it, Photo 5. Hand brushing paint will probably be best here as the paint is considerably thicker than sprayed paints and will smooth over the surface that bit more easily. Gloss paint will certainly be more durable and be far easier to clean than any other surface and a lighter colour will also make the internals of the model considerably brighter and more attractive and show the workings off to their best. Obviously you do not have to worry about a perfect gloss finish, your aim is to fill in some of the rough surface detail and give an overall smoother surface that is easy to wipe clean.
External surfaces
For me the aesthetics of external surfaces is by far the most significant factor and I know there are some models out there that have been beautifully assembled but areas like the insides of bulwarks have been left as rough fibreglass and simply painted over, spoiling the overall appearance (refer back to Photo 2 please). Once again here the solution is very simple and for a little bit of effort a much better looking model can be the result.
In some cases if the surface is fairly even to start with it may need nothing more than sanding down but the roughness of the chopped strand matting usually means this is not an option without removing a lot of material and thinning down the part. Also painting with resin or simply painting a number of coats of paint will improve the surface appearance, but external surfaces almost certainly need to have a nice smooth finish to be able to paint to resemble for example, steel or iron plate.
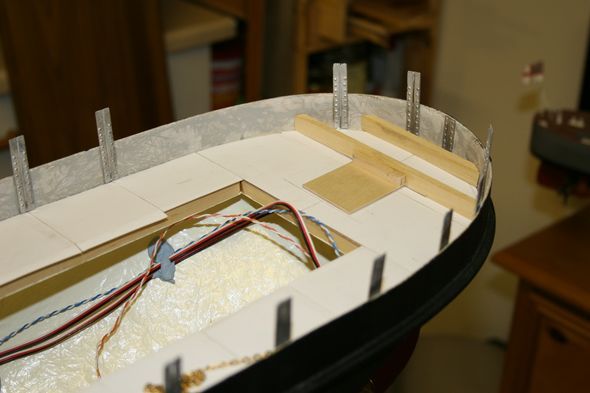
Taking the inside but exposed surface of a bulwark as an example, once the deck is fitted and before any deck covering and internal detailing is added to the bulwark, is usually the best time to prepare the surface. Any form of polyester filler paste can be used but by far the most popular and widely used is David’s P38 filler, available from most car body shop suppliers (please see Photo 3 again). The filler is a two part product consisting of a paste and a hardener, which have to be mixed according to the instructions. Once again this product has a maximum workable life of about fifteen to twenty minutes before it starts to stiffen, so only mix enough that you will be able to use. Once the paste is thoroughly mixed, simply wipe it along the inside face of the bulwark with a wide applicator that allows you to spread it with one pass. This will keep the covering as thin and even as possible and it will mean that the minimum amount of sanding is required. If you use a narrow spreader you will invariably end up with ridges of paste and possibly slightly varying levels making sanding down much more of a chore. When the paste has cured and hardened it can be sanded down to a surprisingly smooth and even finish, a world apart from the rough fibreglass texture you started with, Photo 6. Always use a sanding block for a job such as this to ensure an even finish is generated and never be tempted to hold the sandpaper in your fingers as you will simply generate an uneven surface.
Once the filler has been sanded the surface can be primed and painted in exactly the same way as any other part of your model after all the relevant details and fittings have been added, Photo 7.
Another very effective method of covering rough exposed fibreglass is by simply adding a covering of another material such as thin ply or styrene. It is still worth rubbing over the surface with an abrasive first to remove the high spots and take care not to use a plasticard that is too thin and therefore follows the undulations of the surface. The material can be cut to follow a normal plate pattern or can be applied in larger pieces, relying on subsequent detail such as butt straps to define the plate work. You need to use a bonding material that is not going to leave any air gaps behind the finishing layer and although I have heard of people using body filler and resin as such a material, epoxy glue is going to be the best medium and probably a slow setting type to give you the maximum time to get the covering into place before clamping and waiting for it to cure. When it is set then simply finish it as you would any other surface to give you a perfectly smooth finish One thing to remember with this technique though is that it will increase the thickness which may need to be taken into consideration with subsequent detail and fitting out work.
Finally it is also worth considering how best to finish the other external surfaces of the model such as the hull and the larger components of the model supplied moulded in fibreglass. The important thing to remember is that fibreglass has to be released from the mould once it has cured and usually a wax substance and/or a special type of PVA is painted onto the mould surface to facilitate this. Consequently quite often fibreglass mouldings still have residues of the release agent on them so this must be thoroughly cleaned off before you do anything else. A good hot soapy bath is as good as anything, but a wipe over with a solvent such as turpentine or white spirit is also effective. Then you need to provide a key for whatever you are going to put on next and the best way to do this is to rub the surface all over with wet and dry abrasive paper. A lot depends on the size and scale of your model, but for most hulls something in the region of a 400 to 600 grit will do the job nicely. You are looking for a nice even matt surface indicating that the surface is evenly covered with light abrasions to which the paint can properly adhere. Then, before you consider any form of top coat, two light coats of a primer, best applied by spray can will help you to see exactly what quality of surface you have and should help to show up any imperfections. Photo 8 has the hull in primer and then where additional whitemetal fittings have been installed these have been overpainted. If you are after a perfect finish such as that on a launch hull or a yacht you may then also spray a very fine dusting of matt black paint over the entire surface and rub it back with a fine wet and dry sandpaper such as a 600 grit or even higher. You will then very clearly see any indentations in the hull that can be filled with the same filler as described earlier. The filler can then be rubbed down and the entire hull be given a final primer coat. Don’t forget, never use wet and dry sandpaper on large surfaces in your fingers as it will tend to conform to undulations in the surface and you will never get it perfectly flat. Always hold abrasives on a block, such as a piece of scrap wood, to ensure that the surface is evenly levelled. Having said that, wet and dry sandpaper wrapped around a piece of perhaps 10cm x 3cm of 1mm styrene sheet will be useful to ensure even sanding around a curved bilge hull bottom for example, but this depends on the project in hand.
Once you are finished with the final coat of primer it is then time to apply your choice of top coat. A lot of this depends on your model scale and type so you may need to think about what you want to achieve before you start. A steam coaster is actually going to have a fairly rough hull finish with rivet and plate detail being very much in evidence, Photo 9, but a Windermere steam launch is almost certainly going to want a perfectly smooth high gloss finish.
All the products described in the article can be obtained from most car accessory outlets such as Halfords in the UK or similar elsewhere in the world or online from car body and paint shop suppliers.

